Blog

  • 10 Social Media Tips for Music Publicity

    10 Social Media Tips for Music Publicity

    Most music promo on social media fails for one simple reason: it gets attention, but not action. If I want social media to help a release, I need a clear goal, one CTA per post, short-form video, a pre-save plan, smartlinks, partner support, and weekly tracking.

    Here’s the short version:

    • Pick 2–3 platforms that match the fan base instead of posting everywhere
    • Set a clear artist or label identity before I publish anything
    • Clean up profiles with one main link and one direct CTA
    • Plan posts around release timing, especially the U.S. Friday drop
    • Use short vertical video to push discovery and streams
    • Post on a steady schedule without burning out
    • Mix promo with fan interaction so the feed does not feel like ads
    • Work with DJs, creators, and other artists to reach new listeners
    • Run pre-save campaigns and smartlinks to turn interest into clicks
    • Track clicks, saves, streams, and ticket sales so the next campaign improves

    A few numbers show why this matters: 82% of Gen Z and 70% of millennials in the U.S. find new music through social media and user posts, and 13 of 18 Billboard Hot 100 No. 1 songs in 2023 had ties to TikTok trends. So if I want more streams, pre-saves, and ticket sales, I need a posting plan that moves people from seeing a post to doing one clear next step.

    8 Music Marketing Strategies That Actually Work | Ditto Music
    Ditto Music

    Quick Comparison

    Tip Main job What I focus on
    Choose platforms Reach the right people TikTok, Instagram, YouTube, Facebook, X
    Define brand Make the account easy to place Story, sound, visuals, tone
    Optimize profiles Turn visits into clicks Bio, pinned post, smartlink
    Build a calendar Match posts to release stages Tease, pre-save, release, after
    Lead with video Drive discovery 10–30 second vertical clips
    Post steadily Stay visible 3–5 posts per week
    Balance engagement Keep fans interested 70/30 mix of connection and promo
    Use partners Expand reach DJs, creators, artist collabs
    Push pre-saves and smartlinks Drive action One link, direct CTA
    Track results Improve each release Clicks, saves, streams, sales

    If I keep the message simple and the path clear, social media stops feeling random and starts working like a release system.

    What Good Music Publicity Looks Like on Social Media
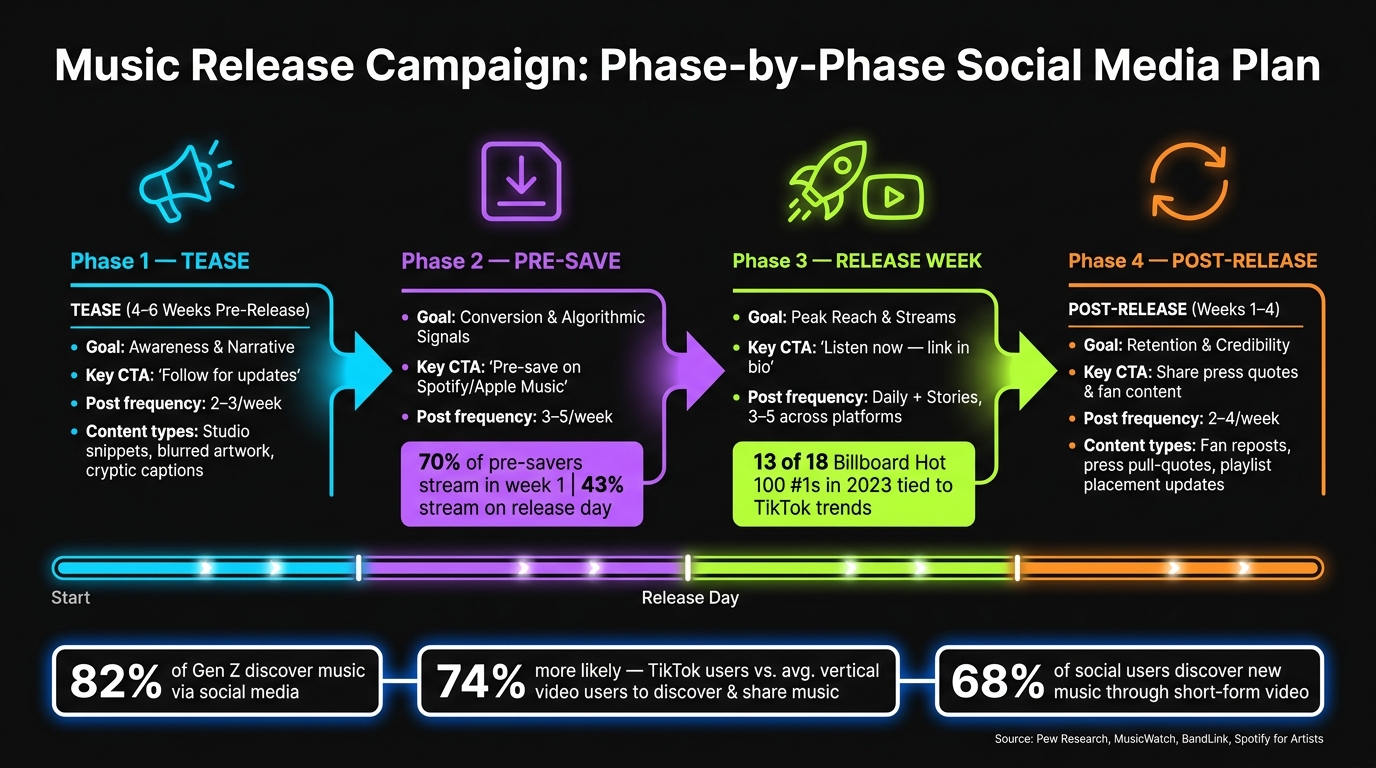
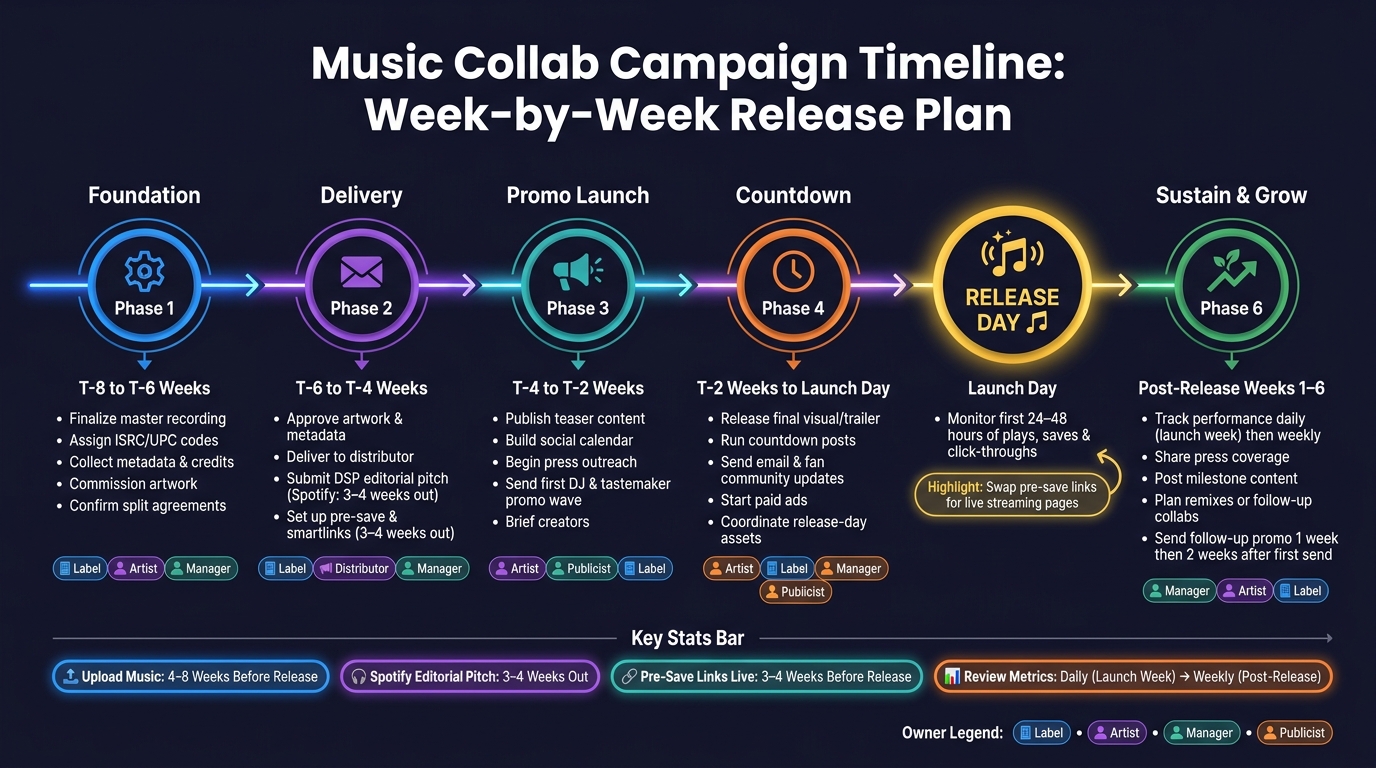
    Music Release Campaign Timeline: From Teaser to Post-Release

    Music Release Campaign Timeline: From Teaser to Post-Release

    Good music publicity uses social media to move people from attention to action. In plain English, it’s not just about getting seen. It’s about getting people to do something.

    That’s why every campaign needs to be built around three things: goals, conversion, and timing.

    Core Publicity Goals

    Strong campaigns usually work toward five goals: awareness, narrative, credibility, retention, and conversion.

    These goals connect with each other. Credibility from DJ support, playlist placements, and press quotes can strengthen awareness. Retention keeps fans around long enough to convert. And narrative gives people a reason to care in the first place. When those pieces work together, social media stops being random posting and starts working like a plan.

    From Attention to Action

    Each key post should have one clear CTA. Not three. Not five. Just one.

    Send fans through a smartlink or another trackable link so you can see what’s working. That part matters. If you can’t track it, you’re guessing.

    In one documented case, UTM tracking on Chance the Rapper‘s merchandise links showed that 60% of his merch sales came from Twitter.

    Timing Around U.S. Release Cycles

    Timing matters just as much as content, especially around U.S. release habits.

    In the U.S., Friday is the standard release day across all major DSPs. So if you make Friday morning your biggest push, you’re walking into a crowded room and trying to shout over everyone else. Attention is already split. A better move is to build momentum before Friday, then use release day for the payoff.

    For national campaigns, schedule posts in Eastern Time first, then adjust based on where your audience is most active.

    Use this cadence as the baseline for every release campaign:

    Campaign Phase Timing Primary Goal Key CTA
    Tease 4–6 weeks pre-release Awareness & narrative "Follow for updates" / behind-the-scenes content
    Pre-Save 3–4 weeks pre-release Conversion & algorithmic signals "Pre-save on Spotify/Apple Music"
    Release Week Friday drop Peak reach & streams "Listen now" / smartlink click
    Post-Release 1–4 weeks after Retention & credibility Press quotes / fan content shares

    1. Choose the Right Social Platforms for Your Audience

    Once your publicity has a clear CTA, the next step is deciding where that CTA should show up. You do not need to post everywhere. In most cases, it makes more sense to focus on two or three platforms your listeners already use.

    Audience Fit

    Audience fit matters more than platform size. Pew Research‘s 2025 data shows that 84% of U.S. adults use YouTube, compared with 71% for Facebook, 50% for Instagram, and 37% for TikTok. That tells you something simple but important: each platform reaches a different group of people.

    As a rule of thumb, TikTok and Instagram lean younger. They tend to work well for pop, hip-hop, R&B, indie, and electronic music. Facebook leans older and can work well for country, classic rock, and jazz acts whose fans still use it to find events. YouTube reaches people across age groups and is the best long-tail option if you want your catalog to stay searchable long after the release cycle ends.

    Release Support

    Each platform has a different job. TikTok works well for teaser testing. Instagram is useful for pre-saves. YouTube is the place for official videos and search traffic. Facebook still does a solid job with events and tour promotion.

    Content Format

    Format matters just as much as the platform itself. TikTok tends to reward short vertical video with a hook right away. Instagram leans toward Reels, photos, and Stories. YouTube usually works best for longer video. Facebook tends to do better with event posts and native video.

    Conversion Potential

    Watch which platform drives streams, pre-saves, tickets, and merch sales, then put more effort into the one that converts best. YouTube also helps with long-term discovery and repeat listening.

    To see what’s pulling its weight, tag every link with UTM parameters and check Spotify for Artists traffic data each week.

    Platform Best For Strongest Conversion
    TikTok Discovery, short-form video, younger audiences Streams via audio use
    Instagram Branding, pre-saves, Reels Pre-saves, merch
    YouTube Long-form content, catalog, search Long-term streams, loyalty
    Facebook Events, older demographics, community Ticket sales

    With your platform mix set, the next step is to define the brand voice and visuals that will carry across each one.

    2. Define Your Artist or Label Brand Before Posting

    Once you know where you’re posting, the next step is simple: decide what your content should signal. Before anything goes live, define your brand. That means your story, your sound, your visuals, your tone, and the reason fans should follow in the first place. If you run a label, add your roster focus and release culture too. That definition should shape every caption, visual, and CTA.

    Start with one sentence that explains who you are, what you sound like, and why fans should care. For example: "Los Angeles-based producer blending nostalgic ’90s R&B with modern trap for late-night listeners." From there, choose 2–3 core colors, one font system, and one image style that fits your sound. The look should match the music. Think bold contrast for trap or hip-hop, or earthy tones for indie folk. Then use those same rules across cover art, teasers, Stories, and videos.

    Audience Fit

    A clear brand works like a filter. It pulls in listeners who connect with your sound, story, and aesthetics, while quietly pushing away people who were never going to stick around. That matters more than most artists think.

    When your brand is clear, the right fans can recognize you fast. When your bio is vague, you tend to pull in mismatched followers, and that usually leads to weaker engagement.

    Release Support

    When your brand is written down, release campaigns get much easier to run. You already know what the cover art should look like, how teaser posts should feel, and how Stories should support the release. You also have a clear message flow: announcement, teaser, pre-save push, release day, and post-release storytelling.

    That kind of structure saves time. Instead of arguing over direction every time a song drops, your team can focus on getting the work out. A defined brand also keeps promo assets and social posts aligned.

    Content Format

    Your brand should shape how your content looks and sounds in every format. Instagram can carry polished visuals. Stories can feel more raw and behind the scenes. TikTok and Reels can lean harder into performance or personality.

    No matter where someone finds you, the editing style, color grading, and caption tone should still feel like you. A fan should be able to land on your TikTok or your YouTube channel and feel that connection right away.

    "Visual consistency helps fans recognize your posts quickly." – Pete, Promoly

    Conversion Potential

    Consistency builds trust. In fact, 81% of consumers say they must trust a brand before buying from it, and it takes 5–7 brand interactions for someone to remember you.

    That’s why your smartlink and pre-save pages should match your social visuals. Use the same artwork, the same colors, and the same tone. When everything lines up, the jump from “I saw this on TikTok” to “I pre-saved it on Spotify” feels smooth instead of awkward.

    Once your brand is set, your profile has to do some actual work. Think of your social profile like a storefront: if people can’t tell who you are, what you make, and what they should do next, you lose the click. The bio matters first because it’s doing the fastest job on the page.

    Audience Fit

    A good bio should do three things at a glance: say who the artist or label is, signal genre and scene, and tell the visitor what to do next. Include your genre, a location or mood cue, and one current priority.

    For labels, the bio should also show roster identity and scene focus so visitors can tell right away whether the account fits what they follow. Example: "Indie-pop artist from Austin | New EP Friday | Listen below".

    Skip vague lines like "living my dream." They don’t help fans, journalists, or playlist curators place you fast. Once the bio is clear, the link should back up that same message.

    Release Support

    Your profile link should change with each phase of the campaign. Switch to a pre-save page 14–21 days out, move to a multi-platform smartlink on release day, then update it again based on the next priority, like tour dates, merch, or a follow-up single. Pinned posts should match that timing so the top of your profile reflects what matters NOW.

    "Pre-saves translate directly into first-week performance, which affects how platforms treat your music going forward." – Promoly

    Even small pre-save numbers can matter. As few as 50–100 pre-saves can affect Spotify’s Release Radar placement for smaller artists.

    Content Format

    Keep the profile layout clean and easy to scan. One main smartlink in the bio, one pinned post tied to the current campaign, and story highlights sorted into categories like "New Music", "Tour", and "Press" give fans a clear path without too much clutter.

    Limit visible links to five or fewer so people aren’t hit with too many choices. A simple order works best:

    • Current release or pre-save
    • Main streaming profile
    • Merch
    • Video
    • Mailing list

    Conversion Potential

    A smartlink often works better than a single destination link because it sends fans to the platform they already use. Analytics can show which destinations convert best, which gives you a better read on what to do in the next campaign.

    The CTA matters just as much. "Stream on Spotify", "Pre-save the album," or "Watch the official video" will beat a vague "New song out now". With the profile in place, the next step is building content around the next release milestone.

    4. Build a Release-Focused Content Calendar

    With your profile set and your smartlink ready, the next job is simple: know what you’re posting and when you’re posting it.

    That’s what a content calendar does. It takes random posting habits and turns them into a plan with clear dates, formats, and goals. Once your profile is ready, the calendar decides when fans see each link and CTA. It also turns your release plan into repeatable posts that match each stage of the campaign.

    Audience Fit

    Before you add dates, check your platform analytics. Instagram Insights, TikTok Analytics, YouTube Studio, and other native tools show when your followers are active. Use your own numbers, not generic posting charts.

    A good starting point is 3–4 posts per week, then post more often as release day gets closer. After you lock in timing, connect each post to the release phase it supports.

    Release Support

    Each post should match a campaign phase, not just sit on a calendar date.

    Phase Timing Goal Frequency
    Tease 6–4 weeks out Awareness 2–3/week
    Announcement 4–2 weeks out Pre-saves, follows 3–5/week
    Peak Hype Final 7 days Maximize intent Daily + Stories
    Release Day Week 0 Drive streams 3–5 across platforms
    Post-Release Weeks 1–4 Retention 2–4/week

    Start with teaser posts early on. Then, once the link is live, shift to direct pre-save CTAs. That keeps each post focused on one job instead of turning the whole campaign into one long promo run.

    Content Format

    Once timing and phase are locked in, format shapes how the calendar works day to day.

    For Instagram, a release week might include Reels, carousels, Stories, and one Live. On TikTok, try several short videos in a day using different parts of the song. That gives you more chances to see what clicks.

    Leave 20–30% of the calendar open for reactive posts. You’ll want space for fan replies, timely moments, and milestone updates.

    Conversion Potential

    Deadline-based CTAs tend to drive the most pre-saves and streams. So instead of saying new music coming soon, say something direct like "Pre-save before Friday."

    Plan your pre-save push to begin 3–4 weeks out. Repeat that message 2–3 times per week, then schedule a final "last chance" post 48 hours before release. On release day, switch every link from pre-save to streaming and post in multiple waves. Sync DJ outreach to those same milestones.

    Done right, the calendar moves fans from teaser to pre-save to stream without dead space in between.

    "Pre-saves are the closest thing to a guaranteed first-day audience." – Promoly

    5. Lead with Short-Form Video

    Your content calendar is set. Next up: the format that gets the most traction. Right now, that’s short-form video.

    The numbers make the case. About 85% of TikTok videos contain music, and U.S. TikTok users are 74% more likely to discover and share new music than the average vertical-video user. Instagram Reels and YouTube Shorts add even more reach. For labels and artists, short-form video is the fastest way to drive discovery and publicity. The job now is simple: turn the plan into clips that stop the scroll.

    Audience Fit

    Each platform plays a different role, so the clip should match the feed it lands in. Use TikTok to test hooks and see what gets picked up. Use Reels to build more fan interest. Use Shorts to keep your catalog in front of people and stretch reach beyond the first wave.

    Release Support

    Every video should tie back to a release moment. Think of each clip as support for a specific stage.

    In the 3–4 weeks before release, post 10–20 second teaser clips that spotlight the hook or chorus and push pre-saves. During release week, post multiple clips built around different visual ideas. That could mean a POV version, a lyric-style edit, or a raw performance clip, all using the official track snippet. Strong TikTok bursts can lift streaming in the following three days, so put your best posts close to release day.

    After release, keep the song moving with:

    • Fan reaction videos
    • Live performance snippets
    • Tour clips
    • Remixes

    Content Format

    Stick with vertical 9:16 video. Keep most clips in the 10–30 second range to support strong completion rates. Open with a strong visual and audio hook in the first 1–3 seconds. If the opening falls flat, people are gone.

    Add on-screen text for lyrics or the CTA, and make sure the clip works both with sound on and on mute. Use the official track snippet tied to your DSP release so platforms can connect the song to "Add to Music App" actions. TikTok says this feature has generated billions of track saves.

    Unpolished clips often beat polished promos because they feel like they belong in the feed.

    Conversion Potential

    Even a strong clip can go nowhere if the next step isn’t clear. Every post needs one simple CTA, like "New single out now – tap the smartlink in my bio" or "Pre-save the EP – link in bio." Send every clip to the same smartlink or pre-save page so the path stays clear and easy to follow.

    Then watch what happens after each post. Track streams, pre-saves, and smartlink clicks to see which angles turn attention into action.

    6. Post Consistently Without Burning Out

    Consistency beats volume. A steady posting rhythm keeps you visible long enough for fans to notice, care, and act.

    Once you’ve picked your platforms and content types, set a pace you can keep up with. That matters more than sprinting for a week and then going quiet.

    Audience Fit

    The right posting frequency depends on your audience and how active they are on each platform. For most artists, a solid baseline is 3–5 posts per week on one main platform. If your account is smaller, 2–3 strong posts per week is often the better target.

    If your team is small, keep it simple. Put your energy into one or two main platforms and show up there on a regular basis instead of trying to post everywhere at once.

    Release Support

    Your posting pace should line up with the same tease, pre-save, release-week, and post-release stages already built into your calendar. When that rhythm stays steady, your asks feel natural instead of pushy.

    Content Format

    Film once, then use that footage in a few ways. One shoot can turn into short clips, Story segments, and still images for different platforms.

    That approach saves time and makes posting feel a lot less like a treadmill.

    Conversion Potential

    Consistency helps your calls to action feel familiar. When people keep seeing you, they’re more ready for the next ask, whether that’s a stream, a ticket sale, or a mailing-list signup.

    It also makes day-to-day engagement easier, because you’re not starting from zero every time you post.

    7. Balance Promotion with Real Fan Engagement

    Use engagement posts so your feed doesn’t feel like one long sales pitch.

    A good place to start is a 70/30 split: about 70% of your posts should build visibility and strengthen the relationship, while 30% can focus on direct promotion tied to a release. If you’re working with an act that already has a loyal fan base, a 50/50 mix can work too. But the idea stays the same: connection first, conversion second. That balance helps your release campaign feel active without turning every post into an ad.

    Audience Fit

    If an artist already posts on a steady schedule, engagement content helps that rhythm feel more human. Personality should lead the way. Behind-the-scenes clips, personal stories, and casual replies usually build trust faster than polished release graphics. And that trust often leads to more discovery and better retention.

    Casual listeners tend to pull back fast when content feels too sales-heavy, so pay close attention to comment quality and share rate over a 4–6 week window. If promo posts keep falling flat, replace one with something built around conversation instead.

    Release Support

    Engagement posts can guide fans through each release stage without another hard sell. Before a drop, try a poll or a lyric guessing game to build anticipation. During release week, fan reactions and a short Q&A can keep the momentum going. After release, sharing a fan video can stretch the campaign in a natural way.

    A simple rule helps here: match each promo post with one conversation post.

    Content Format

    The formats that often spark the most interaction are:

    • Polls
    • Question stickers
    • Fan reposts
    • Live streams

    Instagram Stories polls are useful for fast creative decisions. TikTok duets and open-verse challenges give creators a direct way to join in with your music. Live streams on Instagram or TikTok let you answer comments in the moment and turn passive viewers into fans who care. Just don’t lean on polls too much, or they can start to feel like a tactic instead of a conversation.

    Conversion Potential

    Fans who are engaged tend to convert more often. They’re more likely to pre-save tracks, stream the music, show up to shows, and buy merch. And if someone took part in a creative decision, they may be more likely to follow through than a person who only saw a promo graphic.

    Track the numbers that matter: smartlink clicks, pre-save counts, streams around campaign posts, and ticket sales. That’s how you tell whether engagement is doing more than getting likes.

    "Social media’s greatest strength is its ability to help two-way conversations between artists and fans." – Pete, Online Strategist, Promoly

    8. Work with DJs, Creators, and Other Artists

    Working with DJs, creators, and other artists can put your release in front of people who already trust the person sharing it. That matters. Instead of relying only on your own posts, you can place the same release into new feeds through voices your audience already pays attention to.

    Audience Fit

    The main filter isn’t follower count. It’s fit.

    A DJ with a loyal audience in Atlanta hip-hop or LA EDM can do far more for a focused release than a genre creator with 10 times the reach. Before you reach out, look at whether that person’s audience lines up with your target listeners in age, location, and genre taste. Also check engagement quality. Heavy comment activity, saves, and shares usually point to a community that actually responds to recommendations.

    A good place to start is with micro-creators who already use music in a natural way in their content. That can include:

    • Dance creators
    • Fitness influencers
    • Gamers
    • Fashion vloggers
    • Producers who break down tracks

    Smaller audiences can still drive action, and those creators are often easier to build relationships with before you go bigger.

    Release Support

    Treat collaborator posts as part of the same release calendar, not as a separate push. Send tracks to DJs and tastemakers 2–4 weeks before release, then keep remix content or fan-challenge content moving for 2–6 weeks after launch.

    That timing does different jobs at different stages. Early seeding builds familiarity. Release-day posting helps push momentum when it matters most. Post-launch content helps keep people coming back instead of letting attention vanish after day one. Try to line up creator posts for release day or just after it, when streaming lift is most important.

    A platform like Promoly can make this easier. It lets you send advance promos to targeted DJs and tastemakers, automate reminders around key release dates, and track who opened, played, or downloaded the track.

    Content Format

    Some formats keep showing up because they work: short DJ set clips, creator-led dance videos, skits, and joint live sessions on Instagram or TikTok. For artist-to-artist collaborations, co-posts, remix announcements, and behind-the-scenes studio clips often drive strong cross-audience engagement.

    Make posting easy for collaborators. Give them ready-to-use vertical video assets, short captions that include your @handle and smartlink, and clean audio files. The less work they have to do, the more likely they are to post more than once.

    Conversion Potential

    Third-party endorsements often convert better than self-promotion because trust transfers. When a DJ or creator shares your track, that post can lead to saves, playlist adds, and follows in a way your own account may not.

    MusicWatch data shows that 68% of social media users discover new music through short-form video content.

    Use a trackable smartlink in every collaborative post so you can see which partners are driving streams, follows, and pre-saves, not just impressions. That gives you a clearer read on who to work with again on the next release.

    Once your social posts have done their job and sparked interest, the next step is simple: make the click count. That’s where pre-saves and smartlinks come in.

    Pre-saves let you lock in intent before the song is out. Smartlinks make sure each click lands on the right DSP once release day hits. Used together, they give people a much cleaner path from seeing a post to starting a stream.

    Audience Fit

    Pre-save campaigns tend to work best with people who already know the artist. Think warm audiences, not cold ones.

    That usually includes:

    • Existing fans
    • Engaged followers
    • Email subscribers
    • Similar-artist fans
    • Recent site visitors

    These people already have some level of interest, so asking them to pre-save feels natural instead of like a big ask.

    Release Support

    Start the pre-save campaign about 2 to 6 weeks before release. In many cases, the heaviest push happens during the final 7 days.

    During that window, keep feeding attention back to the same link with teaser clips, countdown posts, and behind-the-scenes content. Then, on release day, switch that same link to the live track. It’s a small move, but it helps keep traffic focused instead of sending people all over the place.

    Promoly supports pre-saves, smartlinks, and promo sends in one dashboard.

    Content Format

    When it comes to links, less is more. One link used again and again usually beats sending people to a bunch of different places.

    Put the pre-save or smartlink in your bio during the pre-release window. Pin a post that features it. Add it as a sticker in Stories. For short-form video, include the call to action both on-screen and in the caption. Use direct language like "Pre-save now" or "Out Friday – link in bio."

    You can change the angle of the post each time. The teaser can shift. The clip can shift. The message can shift a bit too. But the destination should stay the same.

    Conversion Potential

    Pre-saves don’t promise huge first-day numbers. But they can give a release a better starting point.

    BandLink research, citing Spotify for Artists data, found that around 70% of users who pre-save a release stream it in the first week, and 43% of pre-saves lead to streams on release day.

    That early burst of activity can send algorithmic signals to platforms, especially Spotify’s Release Radar, which may help the track reach people beyond the artist’s current audience.

    Smartlink analytics also show which posts, platforms, and regions turn clicks into results. That makes the next campaign less of a guessing game.

    10. Track Performance and Improve Every Campaign

    Posting is only half the work. The other half is checking the numbers to see what actually led to reach, saves, and streams. Once a campaign goes live, focus on what gets people to listen, not just what grabs a quick glance.

    Audience Fit

    Compare your social audience data with Spotify for Artists to see which listeners engage and convert. That gives you a clearer picture of who’s responding and helps shape your next teaser, pre-save, and release-day posts.

    For social performance, put more weight on engagement rate than follower count. Look at likes, comments, shares, and saves divided by reach. A practical benchmark is 3%–8% on Instagram and 5%–15% on TikTok.

    Release Support

    Track every release at the same checkpoints so you can spot patterns from one campaign to the next. Check performance on:

    • release day
    • day 3
    • week 1
    • day 14

    If pre-save clicks jump in the final 3 days, move your next campaign harder into that window. That kind of pattern matters more than guesswork.

    Content Format

    On TikTok and Reels, watch time and completion rate matter most. Around 55% of Reel views come from non-followers, which makes both formats useful for getting in front of new listeners.

    If reach looks strong but engagement stays weak, change the format. In many cases, behind-the-scenes clips and story-first posts beat polished promo because they feel more human and less like an ad.

    Conversion Potential

    Measure saves, pre-saves, and streams together. Save rate is a strong early sign that a song is connecting.

    Promoly gives you another layer of data here. Its dashboard tracks emails opened, track plays, downloads, and feedback from DJs and tastemakers in real time, so you can see how tastemaker response lines up with your social campaign results. Then use that information to shape the next campaign plan.

    Platform and Campaign Planning Tables

    Use the tables below when you need a quick planning view of the tactics above. They boil the main release choices down to the basics.

    Platform Comparison Table

    Match each platform to one main job.

    Platform Best Use Ideal Audience Best Content Format
    YouTube Music video premieres, catalog discovery, long-form content Broad reach Music videos, live sessions, Shorts
    Instagram Visual branding and conversion Millennials & Gen Z Reels, Stories, cover art reveals
    TikTok Viral discovery, trend participation, new listener reach Gen Z / Pop, Hip-Hop, Electronic Short performance clips, audio snippets
    Facebook Event promotion, community groups Older audiences / Country, Classic Rock, Jazz Event pages, Groups, long-form updates
    X Real-time updates and release-day announcements Superfans, journalists, industry Short text posts, smartlink sharing

    Once you pick the platform, line up each post with the right release phase. That keeps the campaign from feeling random and helps each post do one clear job.

    Release Campaign Phase Table

    Campaign Phase Goal Suggested Post Types
    Teaser (4–6 weeks out) Spark curiosity, begin press outreach Studio snippets, blurred artwork, cryptic captions
    Announcement (3–4 weeks out) Drive pre-saves, reveal the release Cover art, track title, pre-save smartlink
    Build-up (1–2 weeks out) Sustain momentum, deepen engagement Behind-the-scenes clips, countdowns, lyric teasers
    Release Day Maximize streams and shares Out-now posts, video premieres, updated bio links
    Post-Release (weeks 1–4) Extend the campaign’s life Fan reposts, press pull-quotes, playlist placement updates

    Use the same link structure across pre-release and release day. That way, fans don’t have to figure out where to click next.

    Before release, use the pre-save page. On release day, switch to the smartlink. Updating that link 48 hours before release for a final push – and again immediately on release day – keeps the fan journey smooth.

    Campaign Element Purpose Example Tool
    Pre-Save Page Adds the track to libraries on release day; signals intent Promoly Pre-Save Campaigns
    Smartlink Landing Page Routes fans to their preferred streaming service from one URL Promoly Smartlinks
    Bio Link Keeps the main profile CTA current throughout the campaign Promoly / social bio
    Promo Mailout Sends the track to DJs and tastemakers for feedback Promoly promo campaigns
    Campaign Analytics Tracks opens, plays, clicks, and conversions Promoly Campaign Dashboard

    Conclusion

    These ten tips work best as a simple system. Pick the right platforms, keep your brand clear, and plan posts around release dates so each post has a purpose. Do that on a steady basis, and attention can turn into listeners.

    Still, reach only means so much if it doesn’t lead anywhere. Track actions you can measure, like pre-saves, streams, clicks, and promo engagement. As Pete, Online Strategist at Promoly, puts it:

    "Social media for music promotion isn’t just about going viral or chasing vanity metrics, it’s about building real connections with listeners who genuinely resonate with your sound."

    That’s why tracking should be part of the campaign from day one, not something you look at later. Use pre-saves, smartlinks, and promo tracking, including a platform like Promoly, where you can monitor opens, plays, and downloads in real time, to tie social reach back to streams, clicks, and sales.

    When that system is running, each release gives you something useful for the next one. Treat every release like a source of data, and your social media starts working less like a guessing game and more like a repeatable publicity system.

    FAQs

    Which social platforms should I focus on first?

    Start with TikTok and Instagram Reels for music discovery and viral potential. Then add YouTube for Shorts and longer music videos.

    If your audience is older, or you run local or community events, add Facebook too.

    The big thing is to keep it simple at first. Focus on one or two platforms so you don’t burn yourself out. Once you see what gets traction and where people respond, you can branch out from there.

    How early should I start promoting a new release?

    Start promoting a new release 6–8 weeks before it drops, then step up your activity as release day gets closer.

    A simple timeline looks like this:

    • Pre-save campaigns: Start 3–6 weeks before release, with 2–3 pushes per week. Then send reminder posts 1 week before and again 48 hours before.
    • Press pitching: Start 4–6 weeks ahead.
    • Playlist/curator outreach: Start 2–4 weeks ahead, or 3–4 weeks ahead if a publicist is handling playlist pitching.

    This kind of rollout gives people time to notice the release more than once. That matters, because one post usually isn’t enough. A few well-timed pushes can help build momentum without making it feel like you’re shouting into the void.

    What metrics matter most for music promotion?

    Focus on metrics that show actual engagement and conversion:

    • Opens and click-throughs
    • Plays and streams
    • Saves, likes, and playlist adds
    • Downloads and pre-save conversions

    You should also track UTM parameters, platform analytics, and geographic data. That way, you can see which campaigns and platforms drive the actions that matter most.

    Related Blog Posts

  • Optimizing Metadata for Algorithmic Playlists

    Optimizing Metadata for Algorithmic Playlists

    If your metadata is wrong, your track can reach the wrong listeners before the music even gets judged.

    I’d sum it up like this: clean names, correct IDs, precise genre and mood tags, and on-time delivery give a track a better shot at being sorted into the right recommendation lanes. Metadata is one of the few parts of playlist targeting I can set before release day, and small mistakes can split streams, hurt indexing, and lead to more skips.

    Here’s the short version:

    • Use one exact artist name and title format across every release
    • Assign the right ISRC and UPC codes and don’t reuse them the wrong way
    • Tag the actual sound, not the playlist lane you want
    • Set mood, language, version, and explicit details correctly
    • Treat remixes, covers, and edits as separate recordings
    • Lock metadata 7–10 days before a Friday release
    • Review results after release and use that data for the next drop

    A few facts stand out:

    • Spotify can map music across 5,000+ genres
    • Promo feedback can be gathered 3–4 weeks before release
    • Metadata should be checked again at least 7 days before release
    • Wrong duplicate delivery can split saves, streams, and playlist adds across multiple records

    My main takeaway: metadata is not admin work to rush through. It directly affects how a track is sorted, matched, and surfaced in algorithmic playlists like Discover Weekly, Release Radar, Daily Mix, and Radio.

    Metadata Optimization Checklist for Algorithmic Playlist Success

    Metadata Optimization Checklist for Algorithmic Playlist Success

    Get the Core Metadata Fields Right First

    Before you get into genre or mood, nail the identity and delivery fields. These are the details that connect a release to the right artist profile and keep reporting tidy.

    Once the track-level metadata is set, review the fields that control identity, delivery, and version matching.

    Artist Names, Track Titles, and Version Formatting

    Use one canonical spelling, capitalization, spacing, and punctuation across every release, distributor submission, and press asset. Even a small spelling shift can split catalog pages and scatter engagement.

    Put each contributor in the right field:

    • primary artist
    • featured artist
    • remixer

    Don’t mash them into one name field or tuck them into the track title. Keep titles clean. Skip label names, promo language, and random ALL CAPS.

    For each recording, use one standard version tag: Original, Remix, Radio Edit, Instrumental, or Live. Keep it simple and steady so platforms can match versions the right way.

    Once naming is set, move to identifiers and credits.

    ISRC, UPC, and Credit Data for Clean Delivery

    Every distinct recording needs its own ISRC. That means the original, remix, radio edit, and live version each need separate codes. If you reuse an ISRC for different versions – or assign a new one just because you changed distributors – you can throw off platform reporting and create mismatched records.

    The UPC works at the release level: one code per album, EP, or single bundle. It’s how the full release is recognized and linked across DSPs, physical distribution, and reporting systems. Track ISRCs and UPCs in one internal catalog, then send that same data to every partner.

    Credit fields matter more than many teams think. Fill in songwriter, composer, producer, publisher, and label/imprint data with full legal names, percentage splits, and PRO affiliations. That’s not just about royalty admin. Complete credit data also helps entity matching across platforms.

    Duplicate Releases and Linking Errors That Hurt Discovery

    Even correct metadata can fall apart if the same recording gets delivered more than once.

    Duplicates are one of the most damaging metadata issues, and they’re easy to miss. They usually show up when the same recording is delivered with different titles, artist spellings, or ISRCs.

    Here’s where it gets rough: streams, saves, and playlist adds can end up split across separate records. Each copy then looks weaker than it is, which makes it less likely to hit the internal thresholds tied to playlists like Discover Weekly. And if listeners land on the wrong version and skip it, that only makes things worse. Skips are a negative behavioral signal.

    The fix is simple in theory, even if it takes discipline in practice: standardize metadata and keep one canonical version per recording so engagement stays together.

    With the core fields cleaned up, genre and mood tags can start pulling their weight.

    Use Genre, Mood, and Context Tags to Improve Recommendation Fit

    Once identity fields are clean, genre and mood shape how platforms sort the track. They’re the last signals you can still control before release-day routing starts.

    Choose Genre and Subgenre Based on the Recording, Not the Marketing Angle

    A common mistake is tagging a song based on the playlists you want rather than the sound you actually made. That can backfire fast. Spotify recognizes more than 5,000 genres, so precise tags give recommendation systems a much better shot at placing tracks where they belong.

    Start with the core sound of the recording: tempo, rhythm, instrumentation, and vocal treatment. If a neo-soul track gets tagged as broad R&B, it may land in bigger playlists where its slower, warmer feel doesn’t connect as well. Tag it more precisely as neo-soul or alternative R&B, and it’s more likely to sit next to songs with a similar groove and tone. Use secondary genres only when the crossover is real, like Latin pop + reggaeton.

    One simple gut check helps here: search Spotify’s "The Sound of [Genre]" or "Introduction to [Genre]" playlists and see if your track matches that lane at a sonic level before you lock in the tags.

    Add Mood, Instrumentation, Language, and Version Context

    Genre sets the lane. Mood tells the platform when and why someone might play the track. That matters because many playlists are built around activities, energy, or feeling, not just style.

    Pick up to two moods that match the track’s emotion and energy in a plain, honest way. A sparse piano piece works for focus or minimalist, which can help it fit study or concentration playlists. A high-BPM, bass-heavy song with aggressive vocals fits intense or dark, which lines up better with gym or gaming use cases. If you stack moods that clash, like chill and intense, the signal gets muddy and placement gets less accurate.

    Instrumentation tags help fill in the picture. A track marked instrumental with details like ambient synths or lofi beats gives the system more context for focus and background listening environments. On the other hand, tags like guitar-driven or 808-heavy can place a song in the right sonic pocket.

    Language and explicit flags matter a lot for U.S.-focused campaigns. A bilingual English/Spanish release that’s tagged the right way can compete in both English-language and Latin algorithmic lanes. Leave off the explicit flag, and you may lose playlist access altogether. If your distributor gives you cultural context fields, use them to note regional influences and help guide editors and algorithms toward the right discovery paths.

    Handle Remixes, Covers, and Alternate Versions Without Confusing the System

    Alternate versions need to be treated as separate metadata objects. That means their own genre and mood tags, plus version labels that describe the recording itself, not just the source song.

    For remixes, use a steady title format like "Song Title (Artist Name Remix)" and list the original artist as the main artist, with the remixer in the right role field. Then tag the remix based on its sound. If an indie pop original gets turned into melodic techno, the remix should carry electronic subgenre tags and moods like energetic or dark. It should not inherit the pop tags from the original.

    For covers, keep the original song name in the title and add a clear label such as "(Cover)" or "(Acoustic Cover)" where platform rules allow. Tag the arrangement you recorded, not the hit version people already know. A stripped-down piano cover may fit indie folk and melancholic, not the pop tags tied to the original release. Clear labeling helps keep that version lined up with the right playlists.

    After release, compare your tag choices against performance data, then use what you learn to tighten future submissions.

    Connect Metadata Optimization to Your Release Workflow and Promotion

    Check Metadata in Your Distributor Workflow and Spotify for Artists

    Spotify for Artists

    Once the core fields are set, timing becomes the next big thing. Lock your metadata 7–10 days before a Friday release so Spotify has time to ingest it and show it in Spotify for Artists under Music > Upcoming.

    That timing matters more than it may seem. A clean delivery gives Spotify time to index the track before Release Radar and other algorithmic surfaces start judging it. If you miss the 7-day pitch window, you can lose Release Radar eligibility and blunt those early engagement signals.

    In your distributor dashboard, double-check the fields that carry the most weight:

    • artist name spelling
    • track title and version tags
    • ISRC and UPC codes
    • genre and subgenre
    • language
    • explicit flag

    Then use the Spotify for Artists pitch form to confirm genre, mood, instrumentation, and audience context. A simple two-person sign-off helps here: one person enters the metadata, and another reviews it. On release day, check the artist profile and credits, and if anything looks off, request fixes through your distributor right away.

    Use Promotion Data to Refine Future Genre and Mood Choices

    Once your metadata is live, promo feedback can tell you if those tags line up with how listeners describe the track in practice.

    Promoly can help with that workflow. Send promos 3–4 weeks before release so you can gather feedback from DJs and tastemakers before the Spotify pitch is finalized. If the responses line up, use them to tighten your genre, subgenre, and mood tags.

    Smartlinks and pre-saves also help keep key details lined up across promo assets and streaming links, including titles, artist names, release dates, UPCs, ISRCs, and Spotify URIs. After release, compare pre-save counts, first-week streams, and Spotify for Artists demographics to see whether your metadata choices matched listener behavior.

    Then use those results to pressure-test the next release before it goes out for distribution.

    Metadata Quality Control Checklist and Key Takeaways

    Pre-Release Metadata Checklist for U.S.-Focused Campaigns

    After your workflow pass, use this checklist to catch issues that can stop indexing or pitching before Spotify picks up the release for Discover Weekly, Release Radar, and Radio. Think of it as your last check before delivery. Run it 3–4 weeks before release, then do one more pitch review at least 7 days out.

    Field What to Verify
    Artist Name Spelling matches exactly across all DSPs and promo assets
    Track Title & Version Correct title and version label across all platforms
    ISRC / UPC Unique codes assigned; consistent across distributor and DSPs
    Genre / Subgenre Reflects the actual recording, not just the marketing angle
    Mood & Instrumentation Accurate descriptors entered in the pitch form
    Explicit Flag Accurately marked to avoid being filtered from clean playlists
    Credits All legal credits complete: featured artists, songwriters, producers, and engineers
    Release Date Confirmed and consistent across DSPs, smartlinks, and press materials

    The explicit flag is one of those small details that can cause a big headache. If it’s set the wrong way, the track can miss clean playlist placement.

    Key Takeaways for Improving Algorithmic Playlist Visibility

    Once the release is live, check performance data to see whether your metadata lined up with how listeners actually responded. That post-release read gives you a better sense of what to adjust next time.

    A few things carry the most weight:

    • Accurate identifiers help avoid split counts and indexing errors.
    • Precise genre and mood tags help place the track into the right queues.
    • On-time delivery gives Spotify enough room for ingestion and pitching.

    After release, use the Audience tab in Spotify for Artists to tighten up subgenre and mood choices for the next release. That loop matters: check metadata before release, study audience behavior after release, then fine-tune the next submission.

    FAQs

    How do metadata mistakes split streams?

    Metadata mistakes can split your streams when artist details don’t match from one platform to the next. A small change, like spelling the artist name a bit differently, can cause a big mess. The same goes for switching distributors for a re-release and not keeping the same ISRC. That can lead to duplicate profiles or broken-up records.

    When that happens, platforms may not combine your total play counts. And that can weaken your performance data while also hurting algorithm-driven recommendations. The fix is pretty simple: keep your metadata identical and accurate across every distribution point so your streaming history stays in one place.

    When should I lock metadata before release?

    Lock and double-check your metadata before you send files to your distributor. Once a release is live, fixing mistakes can be hard – or not possible at all.

    Check every detail: track titles, artist names, genre tags, and ISRC codes. They should be final and error-free. A good rule of thumb is to wrap this up 3 to 4 weeks before your release date, so platforms have time to process everything and editors have time to review it.

    Should remixes and covers use new metadata?

    Yes. Remixes and covers need accurate, version-specific metadata so the right people get credit and listeners can find the track.

    Make sure the track title, artist names, and featured credits match the new version and stay in line with the rest of your catalog. Metadata also helps platforms and recommendation systems sort your music. If something is off, it can hurt playlist visibility. And once a release is live, fixing those details can be hard – or not possible at all.

    Related Blog Posts

  • How to Customize Smartlinks for Music Branding

    How to Customize Smartlinks for Music Branding

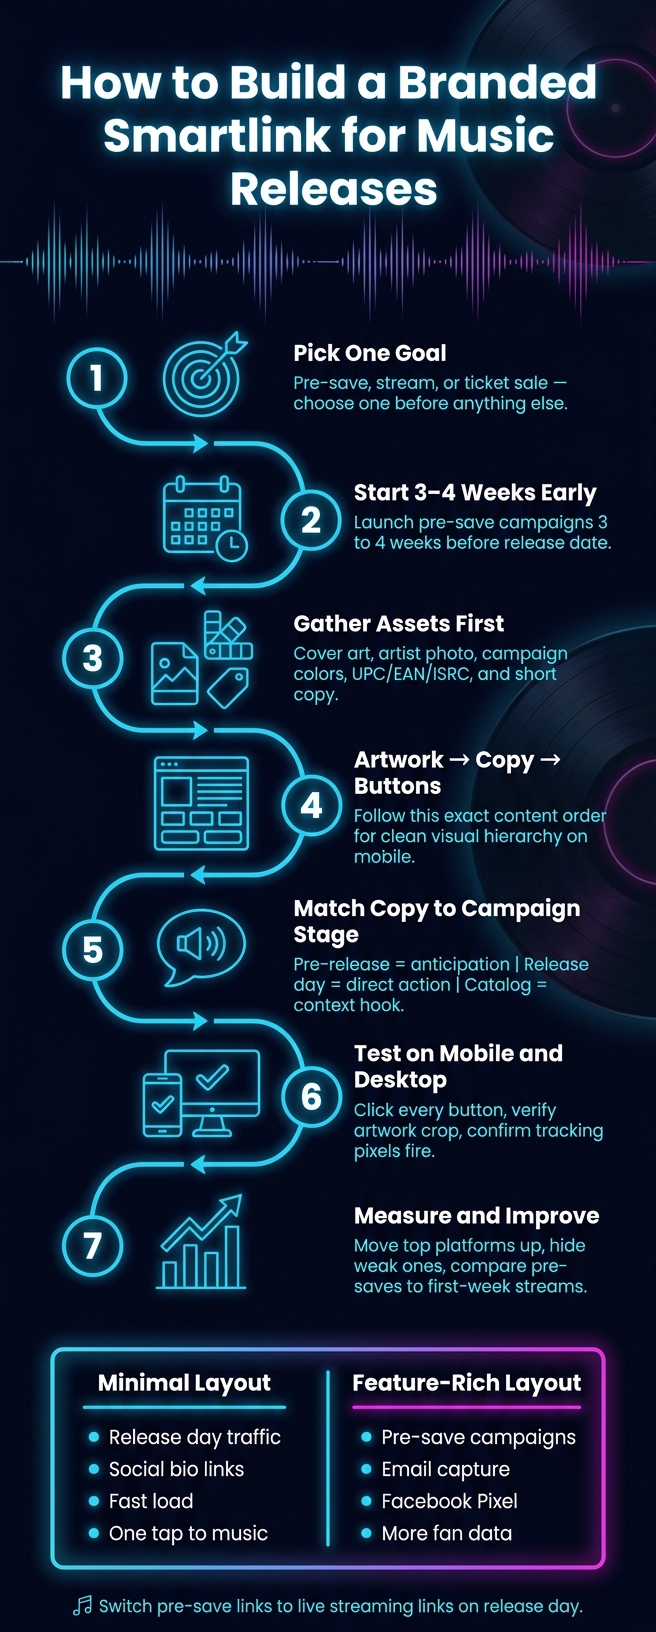
    A smartlink should do one job well: send fans to the right music page with as little friction as possible. If I want it to help my branding, I keep three things tight: one goal, one clear layout, and one message that fits the release stage.

    Here’s the short version:

    • Pick one goal first: pre-save, stream, or ticket sale
    • Only show live destinations: too many choices can hurt clicks
    • Match the page to the release: artwork, colors, and tone should line up
    • Put the top action first: most fans will tap on mobile
    • Keep copy short: artist, title, one line of context, one CTA
    • Test every link before launch: especially mobile buttons and tracking
    • Use click data after launch: move top platforms up, cut weak ones

    A few numbers matter here. Pre-save campaigns often start 3 to 4 weeks before release. Then, on release day, the link should switch from pre-save to live streaming. That timing alone can change how many people finish the action.

    If I had to sum up the whole article in one line, it would be this: make the page look like the campaign, keep it short, and measure what fans click.

    For most releases, I’d think about the page in two simple modes:

    Page type Best for What it includes Main tradeoff
    Simple page Release day traffic, bio links Cover art, short text, platform buttons Fewer extra actions
    Expanded page Pre-save pushes, bigger campaigns Art, copy, tracking, email capture, more tools More for fans to process

    I’d also match the wording to the campaign moment:

    Campaign stage Best CTA style Example
    Pre-release Anticipation Pre-save before Friday
    Release day Direct action Listen Now
    Catalog Context-based hook Stream the track from our new vinyl drop

    So the core idea is simple: plan first, design second, test last. That keeps the smartlink on-brand without turning it into a cluttered page.

    Smartlink Setup Process for Music Releases

    Smartlink Setup Process for Music Releases

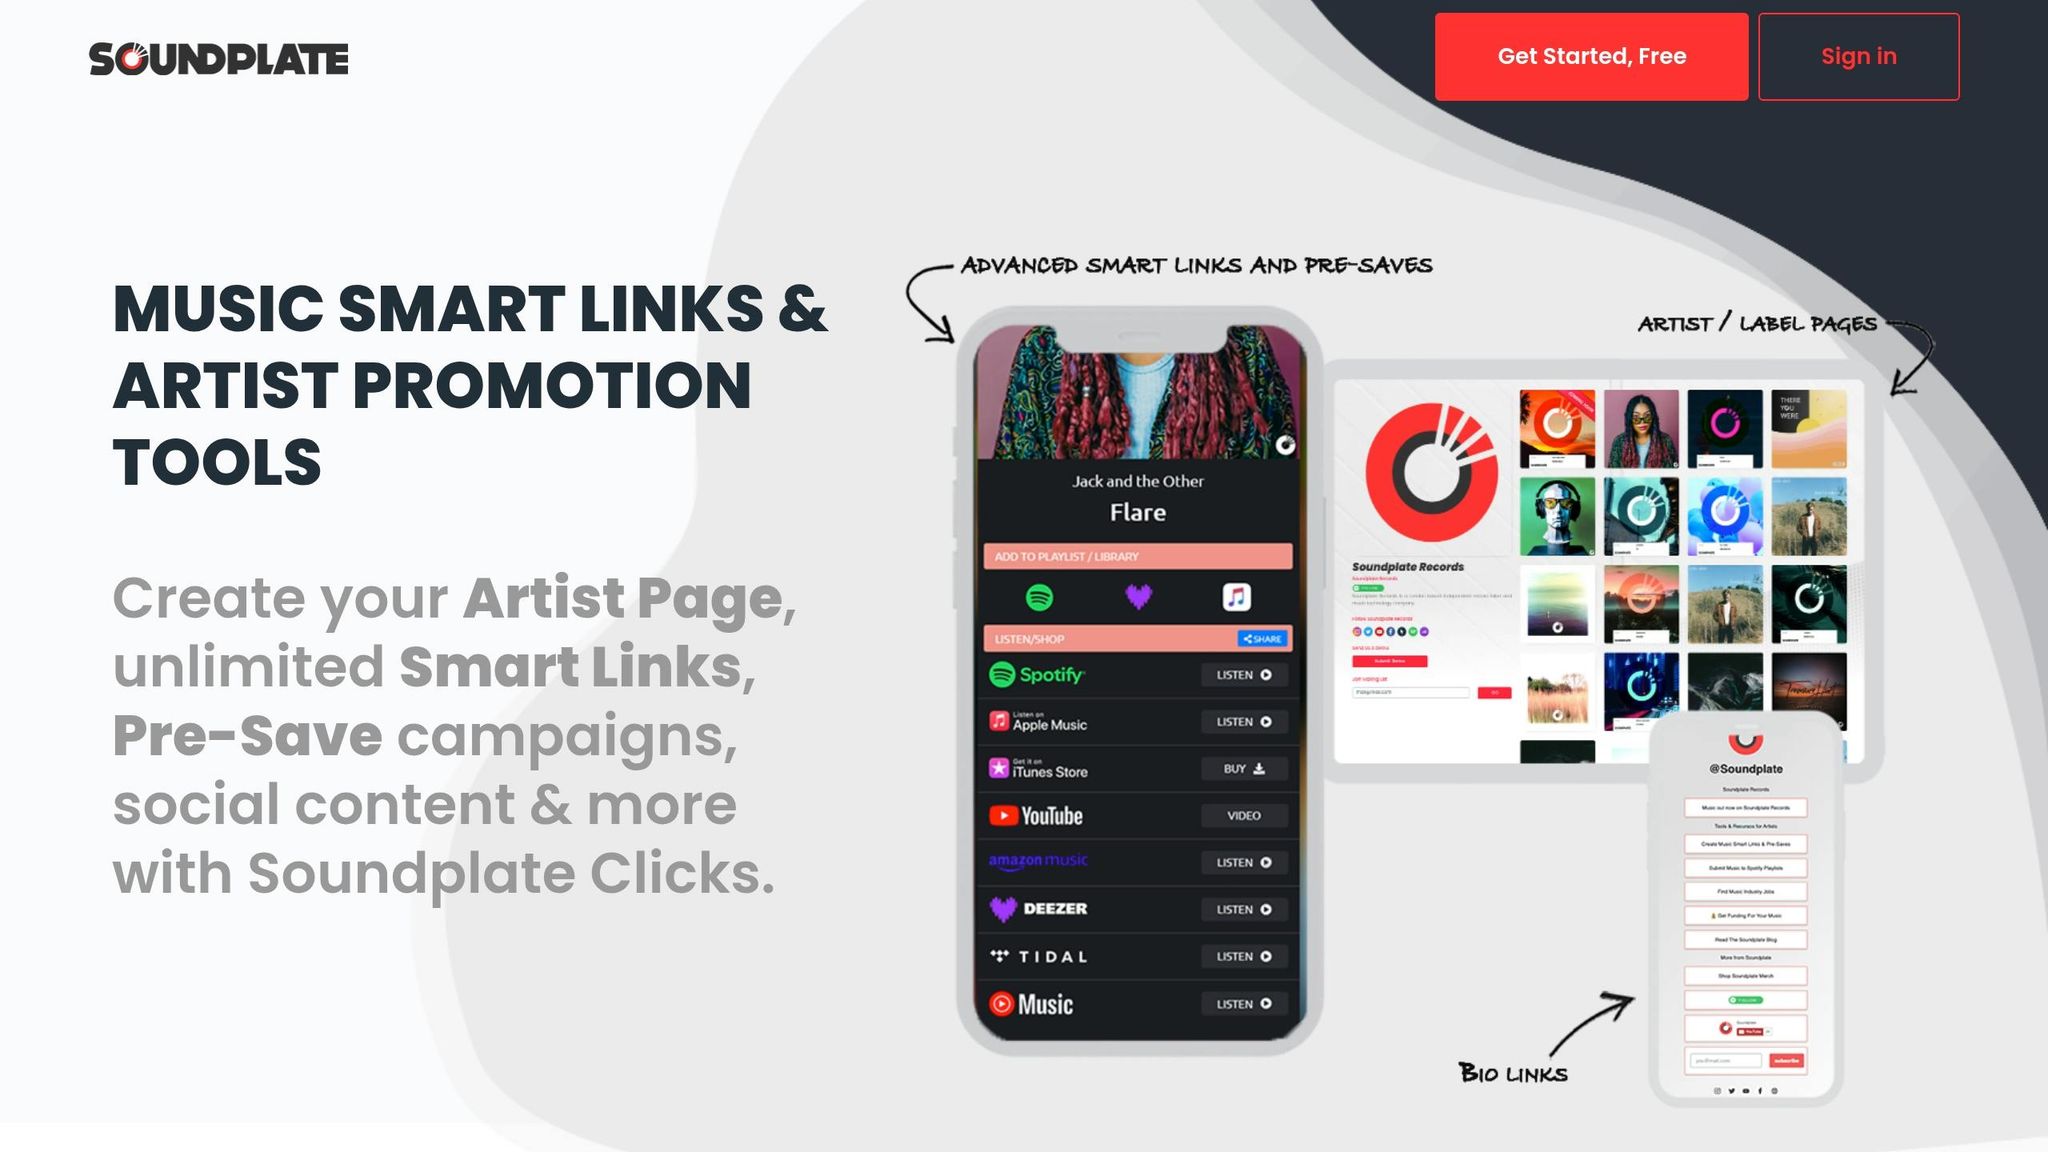
    Soundplate Clicks

    Plan the Page Before You Customize It

    Start by giving the page one clear job: pre-saves, streams, or ticket sales. A branded smartlink works best when every part points to a single action. That one goal shapes the destinations you add, the order they appear in, and the copy you write.

    Choose One Goal and the Right Destinations

    Pick the goal based on where the release is in its rollout. Pre-save campaigns tend to work best when they begin 3 to 4 weeks before the official release date, which gives the page time to build momentum before release. Once the release is live, switch the smartlink to direct streaming links so people who arrive later can still get to the music fast.

    Only include platforms where the release is actually live. If fans have to scroll too much or sort through extra choices, you lose them. Keep the page short so they can act in one tap.

    Prepare Brand Assets and Set Content Order

    Get your assets together before you open the editor. At a minimum, that means high-resolution cover art, an artist profile photo, campaign colors, and a short release description. If you already have your UPC, EAN, or ISRC, Promoly can auto-fill artwork, metadata, and links, which helps cut manual errors.

    Once you have everything in place, keep the content order simple: artwork first, copy second, buttons third. It’s a clean flow. Fans see the visual first, get the context next, and then hit the action.

    Asset Category What to Prepare
    Visuals Cover art, artist profile photo, campaign colors
    Identifiers UPC, EAN, or ISRC
    Copy Short release description, CTA button text
    Tracking Facebook Pixel ID for paid social campaigns

    With the assets ready, you can move straight into layout and copy.

    Customize the Visual Design for an On-Brand Page

    With your assets ready, the next move is shaping a page that matches the release brand. Smartlinks can be customized with artist photos and brand colors so the page looks and feels like the same campaign.

    Set Artwork, Colors, and Layout

    Use the assets you already gathered to make the page feel tied to the release, not like a generic template. Start with your release artwork as the main visual. Paste a UPC, EAN, ISRC, or streaming URL to auto-fill artwork and metadata.

    Then carry over the brand colors you’re already using for this release. Apply them to buttons and accents, and pick a high-contrast button color so the main action stands out on mobile.

    Order Buttons for Speed and Mobile Use

    Put buttons in priority order, with the main destination first. The primary action should sit front and center so it’s easy to tap on a phone. Use direct labels like "Stream on Spotify" or "Buy on Beatport" for this campaign. Hide unreleased platforms.

    Keep the layout clean so the page stays easy to use on mobile.

    Once the visual hierarchy is in place, match the copy to the release stage.

    Minimal vs. Feature-Rich Page Layouts: A Comparison

    The right layout depends on your campaign goal. A minimal page moves fans to one destination fast. A feature-rich page gives them more choices and more data, but it also asks more from them up front.

    Feature Minimal Layout Feature-Rich Layout
    Primary Focus Speed and direct click-throughs Engagement and data collection
    Visual Elements Release artwork and platform buttons Artwork, artist bio, and embeddable players
    Interactive Tools Simple link tracking Pre-save counters, email capture, and Facebook Pixel support
    Load Speed Optimized for near-instant mobile loading May vary depending on embedded players and widgets
    Best Use Case Social media "link in bio" for quick navigation Major release campaigns and pre-save pushes

    Use the minimal layout for release-day traffic. Go with the feature-rich layout when the campaign needs extra actions or tracking. With the layout set, the next step is copy that supports the same single action.

    Write Messaging That Matches the Release and the Audience

    Once the page looks right, the copy has one job: get fans to the main action fast. When the artwork and button order are already doing their part, the words should back that up, not pull in another direction.

    Use Short Copy That Supports the Main Action

    Smartlink copy should support the design, not fight with it. Keep the artist name and release title easy to scan, then add one short description line that gives fans quick context.

    Make the headline easy to read, especially on mobile. One sentence is enough to tell fans what the release is without taking attention away from the main CTA. Use clear, genre-aware button text like "Listen Now", "Stream on Spotify," or "Tune In." Put the main action up front, both in the first line and in the button text.

    Tone matters too. A punk band and a jazz trio shouldn’t sound the same, and generic wording is easy to scroll past.

    After the tone and button text are in place, the next step is to match the message to the campaign stage.

    Adjust Messaging for Pre-Save, Release Day, and Catalog Campaigns

    Different campaign stages need different copy. Pre-save pages should lean into anticipation. Phrases like "Be the first to hear it" or "Pre-save before Friday" give fans a clear reason to act now.

    As release day gets closer, the message should move from anticipation to urgency. Once the music is live, switch to direct listening language like "Listen Now".

    Catalog pages need a different angle. Countdown-style wording doesn’t fit there. Instead, lead with a clear hook, such as playlist placement, a milestone, or a vinyl release.

    Urgency-Led vs. Story-Led Copy: A Comparison

    These three message styles fit different moments.

    Messaging Type Best Used For Key Characteristics Conversion Goal
    Urgency Final 48 hours before release; casual fans Scarcity-focused, time-sensitive, direct Immediate pre-save or stream
    Story Early campaign stages, 3–4 weeks out; core fans Personal, behind-the-scenes, emotional Long-term loyalty and engagement
    Action Release day and beyond Clear, platform-specific, no friction Immediate listening and royalty generation

    "A genuine ‘I’ve been working on this for months and I’d love you to pre-save it’ outperforms a generic graphic every time."

    With the copy and visuals locked in, the last step is simple: get the page live, check every link, and use the first batch of data to make it better.

    Use Branded URLs and Test Every Destination

    Before you share the page, customize the URL. A branded path like yourlabel.com/songtitle can help click-through rates and make the link easier to remember.

    Next, paste a UPC, EAN, ISRC, or a direct streaming URL into your smartlink builder. Promoly can pull in artwork, metadata, and platform links across major DSPs.

    After the metadata loads, check the details one by one:

    • Make sure the artwork crop looks right
    • Confirm the release date is correct
    • Check that the artist name appears exactly as intended
    • Verify that every platform link is live

    Then test the page manually on both mobile and desktop. Click every button. Open every destination. Make sure the layout still looks clean on a smaller screen. If you’re using Facebook Pixel for retargeting, confirm the tracking fires before launch. And if any links point to unreleased music, turn those off before the page goes public.

    Review Click Data and Improve After Launch

    Once the smartlink is live, the first data tells you where fans are getting stuck and what they’re choosing. Track visits, clicks by platform, and conversions.

    If one service gets most of the clicks, move it closer to the top. If another barely gets any action, hide it and keep the page tighter. Small changes like that can clean up the path and make the page easier to use.

    For pre-save campaigns, compare pre-saves against first-week streams. That gives you a clearer read on whether the campaign turned early interest into listening. On release day, switch the smartlink so it sends people straight to the live streaming pages instead of the pre-save URL.

    Conclusion: Keep the Page Simple, Branded, and Measurable

    A good smartlink usually comes down to a handful of repeatable choices: one clear goal, brand assets ready before setup, mobile-friendly visuals, copy that fits the campaign stage, and tracking in place from day one.

    After launch, let the click data do the talking. Reorder buttons, remove weak platforms, and tighten the copy based on what fans actually do. Do that for every release, and the page becomes faster to build and easier to tune up each time.

    FAQs

    There’s no fixed limit. Promoly supports unlimited links in your campaigns.

    With a single URL, barcode, or URI, Promoly can automatically find matching links across nine major streaming platforms and add the right buttons to your landing page. You can also switch specific platforms on or off and add custom links to match your branding.

    When should I switch from pre-save to streaming?

    Switch your smartlink from a pre-save page to a direct streaming link on your official release day.

    Once your music is live, pre-save links stop doing the job you need them to do. At that point, people shouldn’t land on a page asking them to save a release that’s already out. They should be able to hit play right away.

    Updating the link makes that happen. New visitors can find your release and start listening without extra steps. With Promoly, you can make the switch and keep your branding the same.

    What should I test before publishing?

    Before you publish your smartlink, take a minute to review the campaign details and make sure all imported info is correct. Check the artwork, release date, catalog number, and metadata.

    Also make sure your track shows up on the streaming services that matter for this release. Then test any toggled links, custom messaging, and pre-save dates so the landing page lines up with your branding.

    Related Blog Posts

  • How to Find Journalists for Music Promotion

    How to Find Journalists for Music Promotion

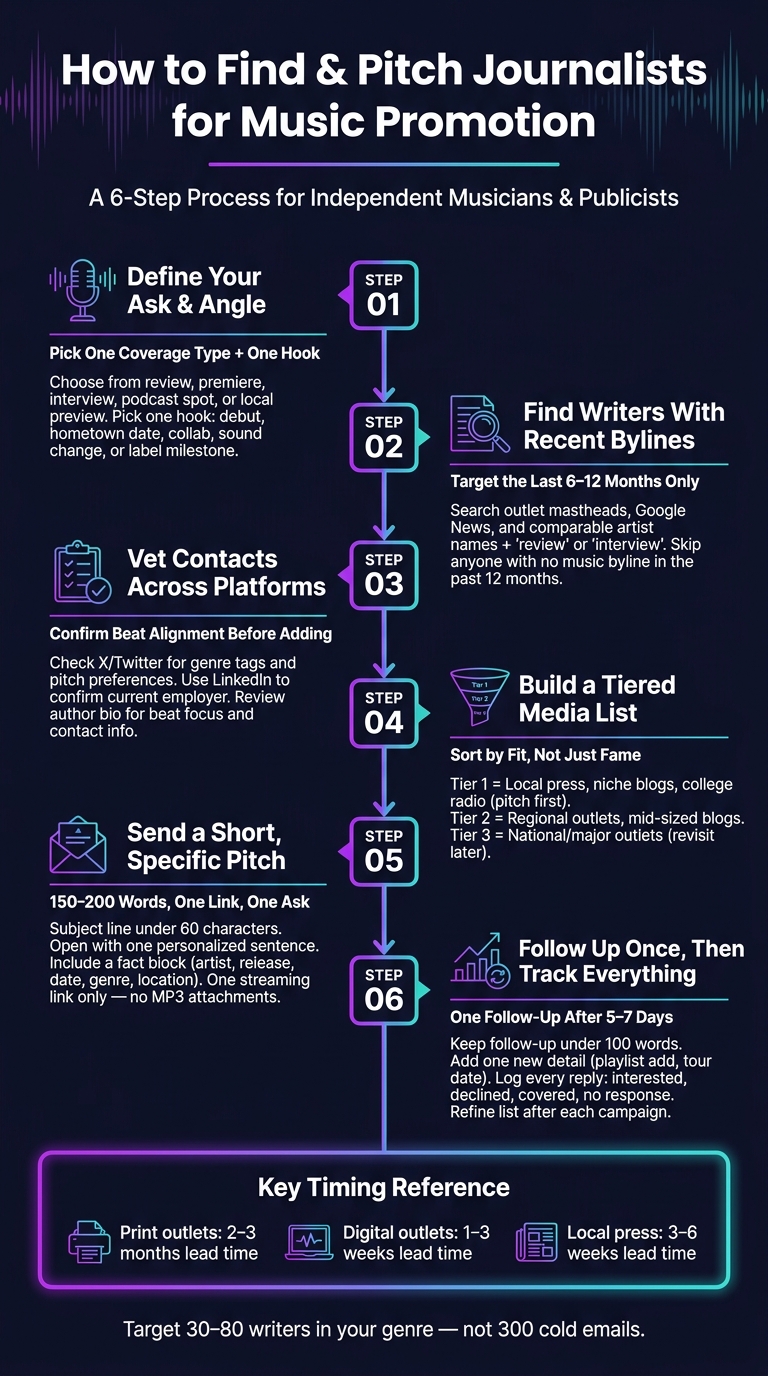
    Most music press outreach fails for one simple reason: the list is wrong. I’d rather pitch 30 to 80 writers who already cover my genre than send 300 cold emails that get ignored.

    Here’s the whole process in plain English: pick the coverage type, choose one story angle, find recent writers in your lane, vet each contact, send a short pitch, and track every reply. The article’s main point is simple: smaller, tighter outreach usually beats mass outreach.

    What I’d take from it:

    • Start with the ask: review, premiere, interview, podcast spot, or local preview
    • Pick one hook: debut, hometown date, collab, sound change, or label milestone
    • Use recent bylines: focus on the last 6 to 12 months
    • Sort contacts by fit: local and niche outlets often make more sense for indie releases
    • Keep pitches short: about 150 to 200 words
    • Follow up once: usually after 5 to 7 days
    • Track results: replies, coverage, passes, and no-response patterns

    A few numbers stand out. Digital outlets may work on 1 to 3 weeks of lead time. Print can need 2 to 3 months. Local press often needs 3 to 6 weeks. Those timing gaps matter as much as the contact list.

    My short take: this is a guide about being selective, not loud. Instead of chasing the biggest names, I’d build a lean list of writers who already cover artists like me, then send each one a clear ask with one listening link and a reason the story fits their beat.

    Music Press Outreach: 6-Step Process for Finding & Pitching Journalists

    Music Press Outreach: 6-Step Process for Finding & Pitching Journalists

    Find journalists and bloggers who already cover your genre

    With your coverage type and angle locked in, start where the beat is active. Go after outlets that already cover your sound. Recent bylines matter more than old media lists.

    Check outlet sites, mastheads, and recent bylines

    Start with national music sites, niche blogs, and local outlets that line up with your audience or tour markets. Head to their music or entertainment sections and scan articles from the last 6–12 months. Focus on reviews, premieres, and interviews about artists who sound like you, based on the coverage type you picked earlier.

    For each piece that fits, write down the journalist’s name, the type of coverage, and the angle they used. Then check the site’s masthead or the writer’s profile page to make sure they still work with that outlet. If their last music byline is older than 12 months, skip them.

    "Check publication mastheads, writer bios, and Twitter/X profiles. Many rock journalists list their email publicly." – Promoly

    From there, expand your search by looking at similar artists. That’s often where extra names show up.

    Search for comparable artists in Google News and genre-specific blogs

    Google News

    Pick 3–5 artists with a sound close to yours. Search their names with terms like review, interview, feature, or single in Google and Google News. This helps you spot outlets and writers who already pay attention to that lane.

    When you find an outlet that looks like a fit, use site search to go further. A search like site:pitchfork.com [artist name] review can show how often that outlet covers artists in the same space. Then click into the writer’s author page and look for patterns. Do they cover your subgenre on a regular basis, or was it just a one-off? If they run a recurring column or series, flag that.

    Check X, LinkedIn, and writer bios to confirm beat alignment

    Once you have a name, make sure they still cover your niche before adding them to your list. On X (formerly Twitter), check their bio for genre labels like “jazz critic” or “metal journalist.” Then scan recent posts to see what they’re sharing now. A lot of writers also post pitch preferences right in their bio.

    LinkedIn helps you confirm where they work now. If they’ve moved into PR or a non-media job, take them off your list. Use those platforms along with the writer bio to confirm the beat before you save the contact.

    Platform What to look for
    X (Twitter) Genre tags, recent shares, pitch preferences
    LinkedIn Current job title, employer, recent activity
    Author page / bio Beat focus, preferred story formats, contact info

    Once you’ve got current names that match your beat, vet each one for outlet fit before adding them to your media list. Then sort the names by outlet size, genre fit, and story angle.

    Vet contacts and build a media list you can actually use

    Once you’ve got names from bylines, mastheads, and profiles, don’t blast them all with the same email. Trim the list first. The goal is simple: keep the people who make sense for this release and set aside the rest.

    Filter contacts by genre, outlet size, and story fit

    Use three filters to narrow your list to people worth contacting.

    The first is genre alignment. Check whether they’ve covered artists who sound like you in the last 6–12 months, not just one random time. A writer who covers your lane on a steady basis is far more useful than someone who briefly dipped into it once.

    The second is outlet type. Split contacts into groups like local press, niche blogs, regional publications, national outlets, college or community radio, and podcasts. That gives you a clearer view of who belongs in your first wave and who can wait.

    The third is fit for your current release. This part matters a lot. If a writer mostly reviews major label albums, they’re probably not a realistic Tier 1 contact for an independent artist putting out a debut EP. A local alt-weekly columnist who often spotlights emerging acts is a much better match. Rank people by fit and reach so your time goes to the contacts most likely to say yes.

    Tier Typical Contacts Best Use
    Tier 1 Local press, niche genre blogs, college radio, scene podcasts Lead with these; highest fit for most independent releases
    Tier 2 Regional outlets, mid-sized genre blogs, larger podcasts Pitch after Tier 1; solid reach with realistic response potential
    Tier 3 National outlets, major publications, commercial radio Keep on file; revisit as you build momentum

    Track the details that improve future outreach

    A media list is only useful if it helps with the next pitch. That means storing more than names and email addresses. Small notes like “full-length albums only,” “prefers streaming links,” or “needs 2–3 weeks’ lead time” can save you from sending the wrong pitch to the wrong person.

    Here’s what to track:

    Field What to Track
    Outlet Name Publication, blog, station, or podcast name
    Outlet Type Local press, niche blog, regional, national, radio, podcast
    Journalist Name The specific writer, editor, host, or DJ
    Role/Title Staff writer, freelancer, music editor, show host
    Email Address Direct contact; avoid generic inboxes when possible
    Genre Focus Specific sub-genres they cover
    Coverage Example Link to a recent article or episode featuring a comparable artist
    Last Contact Date Logged in MM/DD/YYYY format
    Response Status Replied, covered, passed, no response
    Notes/Preferences Pitch length, link format, lead time, content type preferences

    Use those notes to shape your next email, not just fill a spreadsheet. A list like this gets better every time you use it.

    Write pitch emails that are short, specific, and easy to act on

    A strong contact list helps, but it won’t do much if the email misses the reporter’s beat or lands at the wrong time. Your pitch should make the basics clear fast: who you are, what you’re pitching, and why it fits their coverage.

    Build the pitch around one clear ask

    Keep the full email around 150–200 words. That’s usually enough to give a journalist what they need without stuffing the note with extra detail.

    Keep the subject line under 60 characters so it looks clean on mobile. Something like "Austin indie band returns with protest single 09/15/2026" gets to the point right away. Compare that with "New music from me". One gives a hook. The other gives them almost nothing.

    Start with one personalized sentence tied to their actual work. For example: "I saw your recent piece on emerging R&B vocalists in New York and thought my upcoming EP might fit your coverage." That shows you paid attention. Then make the ask plain: "Would you be interested in reviewing my new single?"

    After that, add a short fact block:

    Artist: Luna Reyes Release: "Neon Highways" (Album) Release date: 10/04/2026 Genre: Synth-pop / Electropop Location: Miami, FL Label: Independent

    Then include one listening link – a private SoundCloud stream, an unlisted promo page, or a trackable link. Skip MP3 attachments. Big files can trip spam filters and slow things down on the other end.

    Follow up once and keep the timing realistic

    Send the pitch based on the outlet’s lead time. Print outlets usually need 2–3 months. Digital outlets often work on 1–3 weeks. Local outlets tend to need 3–6 weeks, especially when you have a local angle.

    If you don’t hear back, send one follow-up 5–7 days after the first email. Keep it under 100 words. Briefly mention the first pitch and add one small new detail if you have it – a regional playlist add, a confirmed tour date, anything that makes the story feel more current. More follow-ups usually do more harm than good.

    After you send the pitch, log every reply so you can tighten the list for the next round.

    Track responses, refine your list, and keep outreach organized

    Once the pitch is out, keep using the same list to track what happened next.

    Log opens, replies, coverage, and non-responses

    For every pitch, record the send date, follow-up date, response status, and coverage result. Tag replies as interested, declined, wrong beat, covered, or no response. Those labels make it easier to tell the difference between a journalist who might respond to a better angle and one who just isn’t a match.

    Go a step past reply status and note the release type (single, EP, album), story angle, and asset shared for each send. Small details can tell you a lot. One blogger may skip general announcements but keep replying to exclusive premieres. Another may only cover acts from a certain region. That kind of pattern helps you make the next campaign tighter without adding extra work.

    After each campaign, remove repeat non-fits and move responsive contacts to the top of the list.

    Use Promoly to manage promo sends and track engagement

    Promoly

    If you’re handling multiple releases, manual tracking gets messy fast.

    Promoly puts sends, feedback, and real-time opens, plays, and downloads in one place, so you can follow up based on actual engagement. It also supports separate sender profiles. That means publicists working with multiple artists can keep each campaign tied to the right branding instead of sending everything from one generic address.

    Conclusion: Build a smaller, better-targeted press list

    When you log each campaign, your list gets better over time. Find the right writers, track results, and use each campaign to make the next one more precise.

    FAQs

    How many journalists should I pitch?

    Prioritize quality over quantity. For a first campaign, start small with a well-researched list of journalists who cover your genre. In many cases, 10 contacts is enough to get going.

    For established releases, you can widen that list to 30 to 50 outlets, from major publications to niche blogs. Keep your outreach personal. Use Promoly to track engagement, then tighten up your list based on who opens, listens to, and responds to your music.

    What if I can’t find the right writer’s email?

    If you can’t find a direct email address, check the publication’s masthead, the writer’s bio, and social profiles like X. You can also try the publication’s press contact form or use research tools to track down current contact details.

    Once you have a contact, add it to Promoly so your outreach stays organized. It also helps to build real relationships over time, since warm introductions often work better than cold emails.

    Should I pitch local outlets before national ones?

    Often, it works better to stagger your outreach. Start with larger national outlets, then move to mid-tier publications and smaller blogs.

    That approach can help you build momentum and keep your release timing under control.

    Use Promoly to track which journalists engage with your music, so you can focus follow-ups on the people who’ve already shown interest. And always tailor your pitch to the outlet’s genre focus and the writer’s beat.

    Related Blog Posts

  • Step-by-Step Guide to Setting Up Smartlinks

    Step-by-Step Guide to Setting Up Smartlinks

    If I want more streams and pre-saves from one link, I need to build the page early, keep it simple, test every button, and switch pre-save links to live links on release day.

    Here’s the short version:

    • I use one smartlink instead of posting a pile of Spotify, Apple Music, and other URLs
    • I set up the page 2 to 3 weeks before release to give fans time to pre-save
    • I gather the basics first: artist name, release title, cover art, release date, UPC/ISRC, and store or pre-save links
    • I keep the page focused by showing only the platforms fans are most likely to use
    • I add tracking like UTM tags and a Meta Pixel before launch
    • I test the link on mobile and desktop
    • I check key numbers after launch: clicks, conversion rate, top platforms, traffic sources, and device split

    A smartlink does two jobs at once: it sends fans to the right music service, and it shows me what happens after they click. That matters because if traffic is high but action is low, I know the page needs fewer choices, a clearer main button, or faster mobile load time.

    I also need to watch the most common setup issues:

    • Missing store links
    • Wrong metadata
    • Pre-save ID or date errors
    • Too many buttons on the page

    One simple rule runs through the whole process: the less friction I add, the more people click. In many cases, trimming platform choices in the final 48 hours before release can help more people finish the action I want.

    So when I set up a smartlink, I’m not just making a landing page. I’m building one clean path from promo to pre-save to stream, then using the data to improve the campaign after it goes live.

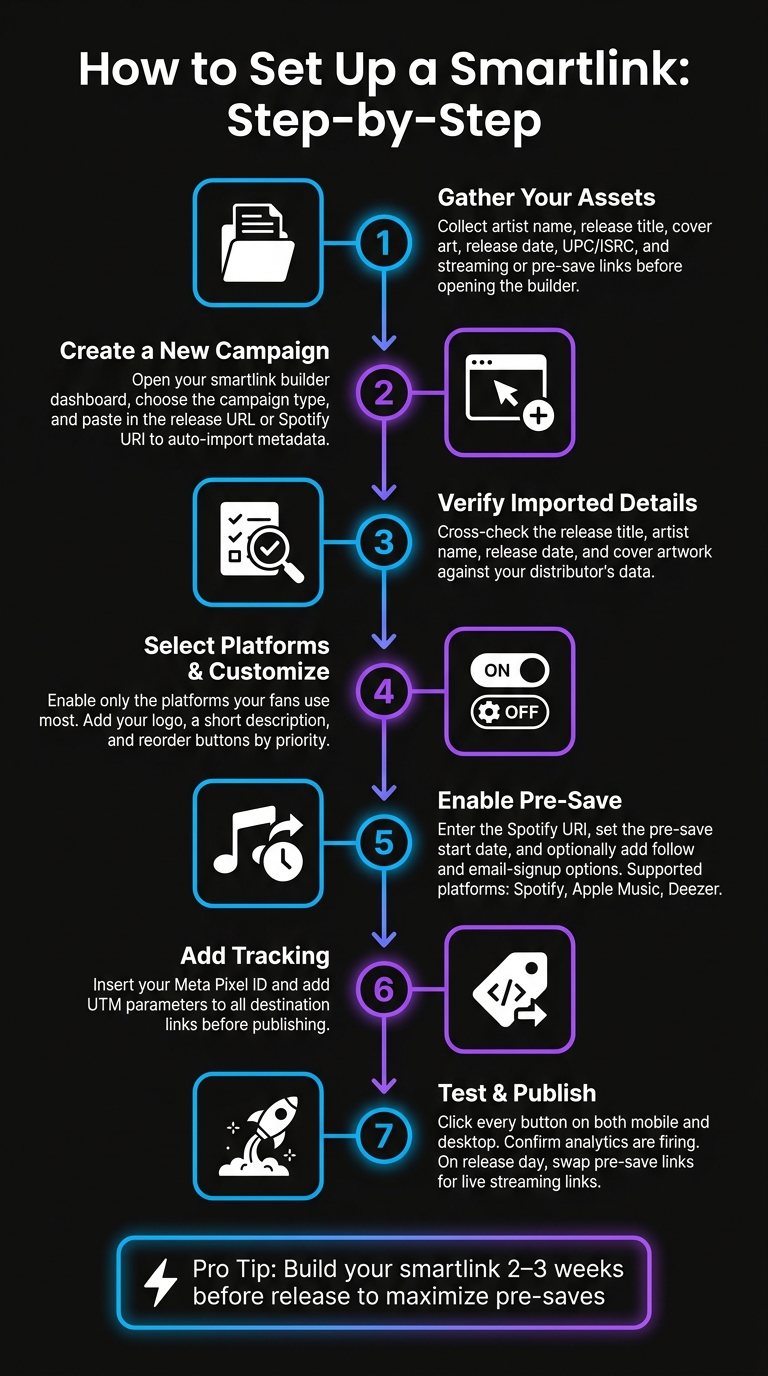
    Get your files and links lined up before you open the builder. It makes the setup smoother, and you can move straight into building instead of hunting for missing pieces.

    Release assets and metadata

    You’ll need the final artist name, release title, cover artwork, and official release date. Keep your UPC or ISRC on hand too. This release info helps pull in artwork and store links, and it’s smart to have the cover file ready in case you need to upload it by hand.

    If the release is already live, paste in one live Spotify or Apple Music URL. The tool can use that to pull the other store links. If the music isn’t out yet, you’ll need the Spotify pre-save URI or link. You can find it in Spotify for Artists after your distributor has delivered the release.

    Pick the streaming and sales links that fit the campaign. You can add Bandcamp, merch, ticket, and social links, but only include them when they help the page do its job. Too many links can make the page feel cluttered.

    Before you publish, add your Meta Pixel ID and tag your destination links with UTM parameters.

    Timing and launch planning

    Build the smartlink as soon as your distributor gives you the pre-save identifier. On release day, switch the page from pre-save mode to live streaming links. After that, you’re ready to build and publish.

    Smartlink Setup Process: From Pre-Save to Release Day

    Smartlink Setup Process: From Pre-Save to Release Day

    Add the release and check imported details

    Once your assets are ready, head to the dashboard and build the campaign in your smartlink builder. Create a new smartlink campaign, choose the campaign type, and paste in the release URL or identifier. The builder will import metadata and store links automatically.

    When the import is done, take a minute to check the details. Match the release title, artist name, release date, and cover artwork against your distributor’s data before you save.

    Select platforms and customize the landing page

    Next, look through the platforms the builder found. Turn off any that don’t fit, then move the rest into the order that makes the most sense for your audience.

    After that, add your logo and a short description. If the music hasn’t come out yet, turn on pre-save here too.

    Set up the pre-save option

    For unreleased music, enable pre-save and enter the Spotify URI to connect the release. Set the pre-save start date so it matches your release date. Supported pre-save platforms are Spotify, Apple Music, and Deezer.

    You can also add follow and email-signup options. Those run alongside the pre-save flow.

    Publish and test every destination

    Before you launch, test the page on desktop and mobile. Click every button yourself and make sure each one opens the right destination for that platform.

    After publishing, open the link yourself one more time to confirm analytics are tracking. If you spot broken or duplicate destinations, remove them right away.

    How to Optimize the Page and Track Performance

    After publishing and testing, use the live page to improve conversion.

    Set up the page to get more clicks and pre-saves

    Once the page is live, use the layout to drive more clicks. Keep only the services your fans use most, and place the pre-save option or main streaming link at the top. Clear button text like "Pre-save on Spotify" or "Listen on Apple Music" tends to beat vague labels. Keep the description short, and make sure the page loads fast on mobile, since most traffic comes from social media apps.

    You can also add a 15–30 second teaser, but only if it helps push people toward the main call to action.

    Use tracking to measure traffic and conversion

    These metrics help you figure out what to fix first.

    Metric What It Shows How To Use It
    Clicks Total traffic If clicks are low, promote the page more or rewrite the hook copy
    Conversion Rate Share of visitors who take action If conversion is low, simplify the layout or add a stronger incentive
    Top Platforms Which services fans use Put the most-used services first
    Traffic Sources Where visitors come from Move budget to the channels that perform best
    Device Behavior Mobile vs. desktop split Adjust visual assets for the devices people use most

    If most pre-saves come from Spotify, make that platform the main focus in future campaigns.

    Compare setup options based on campaign goals

    A release-week push needs a different setup than a long-term growth play. Use the table below as a post-launch checklist when making changes.

    Setting Effect on Pre-Save Conversion When To Use
    Fewer Platform Buttons Increases conversion by reducing choice paralysis Use during the final 48 hours before release
    Embedded Audio Player Increases engagement; fans are more likely to save after hearing a preview Use when you have a strong teaser clip
    Social Media Links Can distract from the main CTA Use when long-term growth is the secondary goal
    Tracking Pixels (e.g., Facebook) Supports retargeting Essential when running paid social campaigns
    Email Capture Adds a step but builds a direct marketing list Use when long-term fan retention matters more than a single pre-save

    Common Setup Problems and How to Fix Them

    When a smartlink isn’t doing its job, there are usually three places to look: delivery, pre-save setup, and page friction.

    If a platform button is missing, first check whether the release has actually reached that store. Then look at the distributor dashboard and confirm the title, artist name, artwork, and barcode are all correct. A bad barcode can pull in the wrong release details.

    If everything looks right in the distributor but the smartlink still shows old or incorrect info, refresh the metadata manually or upload the right artwork in the smartlink editor. Most smartlink tools also let you turn platform buttons on or off and paste in a direct streaming URL if auto-population doesn’t work.

    If the store info checks out, the next place to look is the pre-save setup.

    Pre-save errors and access issues

    Pre-save problems usually come down to one of three things: the wrong identifier, the wrong date, or a platform that isn’t connected.

    Use the release UPC, EAN, or Spotify URI. If a Spotify URL doesn’t work, convert it to a URI and try again.

    You should also match the pre-save start date to the distributor’s delivery timeline. If the page goes live too early or too late, things can break. Once release day arrives, swap the pre-save link out and send people to live streaming links instead.

    If the pre-save is working but people still aren’t clicking, the issue is often the page itself.

    Low conversion after launch

    High traffic with low clicks usually points to friction. In plain English: people land on the page, but something slows them down or makes the next step feel like work.

    A few fixes can help:

    • Cut down the number of platform choices
    • Move the main CTA higher on the page
    • Improve mobile load speed

    You can also give people a better reason to act. A short personal note can help, and so can a simple incentive like exclusive content or a prize draw.

    Conclusion: Publish, Test, and Refine

    A smartlink only works if the setup is right. That means accurate release data, confirmed platform destinations, a working pre-save flow, and a page that loads fast on mobile. That’s the baseline.

    Once the page is built, do your final checks before you publish. Click every button. Make sure each DSP opens the right destination. Check that analytics are firing as expected. Then set a release-day reminder to replace pre-save links with live stream links, so fans land on the live release.

    After launch, let performance data shape your promo work. Use live data to adjust where you put your effort. Double down on the platforms your audience clicks most and the channels that drive pre-saves.

    Keep it simple for fans and useful for your team: build it clean, test it well, and refine it as the campaign moves forward.

    FAQs

    Set up your smartlink as soon as your release date is locked in and your music is scheduled with your distributor.

    For pre-save campaigns, try to get it live 2–3 weeks before release. That gives you time to build momentum and collect saves before launch day. In Promoly, you can create one with a UPC, ISRC, or a direct URL from a supported platform.

    What should I do on release day?

    On release day, update your smartlink. After your music goes live, pre-save links stop working, so swap them out for direct streaming links. That way, new visitors can find your release fast and hit play without any friction.

    Check the updated link on both mobile and desktop before you send traffic to it. Then use it in your release-day social posts and email campaigns.

    If you’re using Promoly, you can track clicks, plays, and platform preferences in real time from the dashboard.

    If your smartlink gets clicks but not conversions, there’s probably a gap between your call to action and what listeners see next.

    Start with your analytics. Look for drop-off points so you can see where people lose interest or leave the page.

    Then check the basics:

    • Make sure your landing page is mobile-optimized and loads fast
    • Confirm your pre-save links are set up correctly
    • Give fans a clear reason to act before release day

    You can also use Promoly’s tracking to find platforms that aren’t pulling their weight.

    Related Blog Posts

  • 5 Email Templates for Music Magazine Pitches

    5 Email Templates for Music Magazine Pitches

    Most music magazine pitches fail for one simple reason: they ask too much, say too much, or don’t fit the outlet. If I want a better shot at coverage, I need to send a short email with one clear ask, one link, a release date in U.S. format like Aug. 3, 2026, and one line that shows I know the publication.

    Here’s the full point of this guide in plain English:

    • I get 5 pitch types: new single review, premiere request, interview, feature/profile, and follow-up
    • I keep most pitch bodies around 51–150 words, a range tied to a 7.13% response rate
    • I answer 3 questions fast: Who is this? What is coming out? Why does it fit here?
    • I use one private streaming link, not attachments and not a pile of links
    • I send each pitch at the right time:
      • 10–14 days before release for many single reviews
      • 3–4 weeks early for many premiere and interview asks
      • 4–6 weeks early for features around an EP or album
      • 5–7 business days later for a review follow-up

    This article is useful if I’m an artist, label, or publicist trying to pitch U.S.-based online music outlets. The main idea is simple: short, direct, outlet-specific emails get more attention than mass copy-paste messages.

    Quick Comparison

    Template Best for Main ask When to send
    New Single Review A new track that needs a write-up Review or new music roundup 10–14 days before release
    Premiere Request An exclusive first stream or video post One-outlet-only premiere 2–4 weeks before premiere date
    Interview A release with a story behind it Q&A, phone, or Zoom interview About 3 weeks or more ahead
    Feature / Profile A bigger artist story Profile, spotlight, or scene piece 4–6 weeks before release
    Follow-Up No reply to first pitch Short check-in with new info 48 hours to 10 business days, based on ask

    The bottom line: if I match the pitch type to the coverage I want, keep the email tight, and make the fit obvious, I give editors an easier yes.

    5 Music Magazine Pitch Templates: Quick Reference Guide

    5 Music Magazine Pitch Templates: Quick Reference Guide

    How to get your music on blogs and in magazines | 7 PR tips

    What Music Magazines Look for in a Pitch

    Editors move fast. Most of them want to scan a pitch in less than a minute and answer three things right away: Who is this? What are they releasing? Why does it belong here?

    One PR roundup found that pitch bodies in the 51–150 word range can hit a 7.13% response rate, which is much higher than longer emails. That alone is a good reason to keep your pitch short.

    Every pitch should include these core pieces:

    Element What to Include
    Recipient name The editor’s or writer’s actual name – never "Hi there" or "To whom it may concern"
    Artist and release name In the subject line and the first sentence
    Genre and subgenre e.g., "indie rock / dream pop" – use specific terms, not vague labels like "genre-bending"
    Release date U.S. format only: Aug. 3, 2026 – never 08/03/26
    One private streaming link A single, click-and-play link – no attachments
    Short bio 2–3 sentences: city, sound, one or two notable points
    Press kit link Bio, high-res photos, artwork, credits, and prior coverage – all in one place
    Fit statement One sentence referencing the outlet’s recent coverage or a column

    Use these basics to shape the templates below.

    The fit statement is where a lot of pitches miss the mark. It’s the part that shows you did your homework. A line like "I saw your recent coverage of Snail Mail and your indie rock reviews column – this single sits in that space" tells the editor this wasn’t sent to 200 people at once.

    Without that line, even a polished email can feel like a copy-paste blast.

    "A named pitch to the journalist who covers your style gets read. A submission to a generic inbox often doesn’t." – Promoly

    For formatting, stick to U.S. style. Use spellings like favorite and catalog. Write dates as Aug. 3, 2026. Format numbers with commas, like 15,000 monthly listeners. These are the nonnegotiables. The templates below show what this looks like in practice.

    1. New Single Review Pitch

    Best use case

    A review pitch has one job: help an editor hear the song fast and understand why it belongs in their section.

    Use this template when your single is already live or coming out soon, and you want a written review or short write-up in a new music section, roundup, or track-of-the-day column. It works especially well for emerging artists. You may not have the story depth for a full interview yet, but you can still get attention through critical coverage and discovery-focused write-ups.

    Core assets to include

    Include:

    • A private or unlisted streaming link
    • Artist name
    • Track title
    • U.S. release date
    • Genre
    • A brief "for fans of" comparison
    • A press kit with bio, photo, artwork, and prior coverage

    Once you have those details ready, be direct about what you’re asking for.

    Primary editorial ask

    Put the ask near the top of the email in one clear sentence. For example: "I’d love to submit ‘[Song Title]’ for consideration in your new music section or weekly review column."

    If the outlet has a named feature, like "First Listen" or "New Tracks", mention it directly. That small touch shows you’ve read the publication, and it gives the editor an easier way to place your pitch.

    Ideal send timing

    Send review pitches 10–14 days before release. Major outlets may need three to four weeks, while smaller blogs often need one to two weeks. If the single is already out, pitch it within the first two to four weeks.

    If you’re doing outreach at scale, Promoly can send secure promo links and track opens, plays, and downloads in real time. That gives you a clear read on timing and helps you plan the next template in your outreach cycle.

    2. Premiere Request Pitch

    Best use case

    A premiere request pitch gives one outlet the exclusive first stream or first look at your track or video before it appears anywhere else.

    Use this pitch only for outlets that already post premieres or first-listen features.

    It fits best when you’re pitching:

    • a new single
    • a music video debut
    • a visualizer
    • a key album track with a clear story behind it

    The angle matters a lot here. If there’s a strong story behind the release, the pitch is much easier to place.

    One more thing: send the same premiere to only one outlet at a time. If you offer the same exclusive to a few outlets at once, you can hurt your credibility.

    Core assets to include

    Keep the package tight. Include:

    • one private streaming link
    • a short bio or EPK with photos
    • artwork and key credits
    • one or two lines that explain the premiere angle

    Primary editorial ask

    Be direct. Put the ask in both the subject line and the first line of the email.

    A subject line like "Premiere request: [Artist] – [Song Title] (out [Release Date])" tells the editor right away what the email is about.

    Then spell out the offer in one sentence: "I’d love to offer [Outlet Name] the exclusive premiere of [Title] on [Date]."

    Also say exactly what the outlet would be publishing with the premiere. Don’t make them guess.

    Ideal send timing

    Try to pitch 3–4 weeks before your target premiere date for major online outlets, and 2–3 weeks ahead for smaller blogs and niche sites.

    Make sure all final assets are ready before the outlet locks in the date.

    If the outlet needs more room for context than a premiere post usually gives, use the interview pitch below.

    3. Interview Pitch

    Best use case

    Use an interview pitch when a release needs more than a first listen. This works best when the artist has a timely story tied to the music, not just a new drop. Think along the lines of a new album or EP cycle, a tour kickoff, a label signing, or a backstory that connects with a current conversation.

    "Journalists write stories. Give them an angle: a debut release, a label anniversary, a collaboration story. The music supports the narrative."

    That angle gives the outlet a reason to assign the piece. Your job is to make that story clear from the start.

    Core assets to include

    Keep the package tight and useful. Include:

    • A short artist bio of 150–250 words
    • A private streaming link to the key track or project
    • A link to the EPK with hi-res press photos and prior press quotes
    • A few suggested talking points that match the outlet’s tone
    • Clear availability in a U.S. time zone, such as "Available weekdays, 10:00 a.m.–3:00 p.m. PT."

    If you have strong campaign feedback or play data, add one relevant metric in a single bullet. One sharp data point lands better than a pile of numbers.

    Primary editorial ask

    Lead with the interview request in the first line. For example: "I’d love to arrange a short interview with [Artist] around their upcoming EP, releasing on October 18, 2026."

    Then give the editor a few format options, such as email Q&A, Zoom, or a 20–30 minute phone call. That makes the ask easier to say yes to.

    It also helps to include two or three suggested interview questions. This gives the editor a fast read on the angle and shows where the conversation could go.

    Ideal send timing

    Send the pitch at least three weeks ahead. For major outlets, aim for 3–4 weeks. For smaller sites, 2–4 weeks is a good range.

    Timing during the week matters too. Tuesday, Wednesday, or Thursday in the middle of the morning, based on the outlet’s time zone, tends to work best. Monday inboxes are often packed.

    Example: "The EP releases Oct. 18, 2026, and [Artist] is available for interviews Sept. 15–Oct. 10, 2026."

    4. Feature or Artist Profile Pitch

    Best use case

    The earlier templates are built to pitch a song, a premiere, or an interview. This one is different. It pitches the artist’s bigger story.

    Use it when there’s a clear angle beyond the new release, like a career shift, a tie to a local scene, a key collaboration, or a milestone such as a debut album or label signing. A feature also has a longer shelf life than a review or premiere. It can keep building trust and name recognition over time.

    This is the right template when the release needs context, not just coverage.

    Core assets to include

    Send a full EPK that includes:

    • a short bio
    • a long bio
    • 2–3 hi-res photos with credits
    • key tracks
    • key milestones

    Also add one or two specific data points as context, not as a hard sell. For example: "Over the past six months, [Artist] has grown from 10,000 to 45,000 monthly listeners, driven largely by regional touring in the Midwest." That kind of framing shows movement without sounding pushy.

    Primary editorial ask

    Open with the request in the first sentence. Then give one angle that lines up with the outlet’s coverage.

    After that, offer one format option, such as a narrative profile, a Q&A, or an "Artist to Watch" spotlight. You can also mention that you’re open to a shorter spotlight if that works better for their editorial calendar.

    Ideal send timing

    Feature pitches need more lead time than review or premiere asks.

    Timing Trigger Recommended Lead Time
    Album or EP release 4–6 weeks before release date
    U.S. tour launch 6–8 weeks before first show
    Collaboration or signing announcement 2–4 weeks before public reveal

    5. Follow-Up Pitch

    Best use case

    If your first pitch gets no reply, send one short follow-up instead of starting over. Stick to follow-ups only when the first note was clear and simply went unanswered. If your tracking shows the editor opened, played, or downloaded the pitch, a brief reply makes sense.

    For non-urgent reviews and features, the first follow-up usually makes sense after 5–7 business days. Interviews and profiles can wait a bit longer, around 7–10 business days. If you’re pitching a premiere tied to a set release date, move faster: 48–72 hours after the first pitch is a reasonable window.

    A follow-up works best when you have actual news to share. Maybe the song landed on a playlist, a tour date just dropped, or the release moved up the charts. That gives the editor a fresh reason to look again, instead of feeling like they’re just being poked.

    Core assets to include

    Reply in the same email thread so the editor can see the full exchange right away. That saves them from digging around and saves you from repeating yourself.

    Keep it tight – under 200 words. Add the track or release link again, mention any new update in a line or two, and make the next step easy. If you can, put the stream, bio, and press photos into one smartlink so the editor can check everything in one click.

    Primary editorial ask

    Say what you want in one clear sentence. For example: "Would this be a fit for your weekly new tracks column?" or "Would you be open to a short review or adding this to your new music roundup?"

    Also give them an easy out. A line like "Totally understand if it’s not the right fit – thanks for taking a look" helps keep things warm even if they say no.

    Ideal send timing

    The table below covers the most common situations:

    Coverage Type Follow-Up Window Max Follow-Ups
    Review or feature 5–7 business days after initial pitch 2
    Premiere (release-date tied) 48–72 hours after initial pitch 1–2
    Interview or profile 7–10 business days after initial pitch 2

    Send follow-ups Tuesday through Thursday, ideally between 8:00–11:00 a.m. local time, when open rates tend to be highest. Skip Monday mornings and Friday afternoons. Those windows are often packed with deadline triage and weekend planning.

    Use the quick-reference table next to match each template to the right outreach scenario.

    Quick Reference: When to Use Each Template

    Use this table to line up your pitch type with the outlet’s workload and your release goal.

    Template Primary Goal Strongest Hook Required Assets Editor workload
    New Single Review Secure an editorial review of your new single or album Timely release date, a strong genre match, and early buzz like press quotes or playlist support Streaming link, short press release or one-sheet, high-res press photo, release date, and label info Medium – requires listening time and a written review
    Premiere Request Land an exclusive or first-look premiere for your new track or music video Exclusivity, plus a strong story behind the release tied to tour dates, festival appearances, or sync placements Private pre-release link, final audio/video, artwork, proposed premiere date/time, and a short story or talking points High – time-sensitive post with scheduling and copy prep
    Interview Set up an interview to spotlight your story, process, and upcoming releases A strong artist story or timely theme editors can shape into a narrative Artist bio, press photos, key talking points or suggested themes, and links to latest releases and notable achievements High – interview planning, Q&A, editing, and layout
    Feature or Artist Profile Earn a feature article that places your work within a broader scene or narrative Your role in a broader scene or trend, plus notable achievements that can support a long-form piece EPK/extended bio, scene/context info, highlight tracks, key metrics, and past coverage High – research-heavy long-form piece or scene profile
    Follow-Up Check in on an earlier pitch, share updates, and keep the relationship warm New developments like tour dates, playlist adds, or updated stats that give the original pitch new life Original pitch reference, updated stats, press quotes, or tour info, and latest links Low – quick check-in, minimal time to review

    The editor workload column helps you choose the right pitch type fast.

    Pitch Checklist and Formatting Notes

    Use this final pass to tighten any of the five templates before you send them. Every pitch should include a subject line, a tailored reference, the release or story details, one link, and a clean sign-off.

    A clear subject line does a lot of work up front. Something like "Review Request: Indie Rock Single ‘Hollow Ground’ – Out September 15" tells an editor what you want before they even open the email.

    Keep the body between 100 and 200 words. Use short paragraphs, plain text, and subject lines under 60 characters. Editors often skim pitches on mobile first, and a long wall of text makes that harder to do.

    Stick with plain text and light formatting. Skip embedded images, big logos, and multiple font colors. Those extras can trip spam filters and slow loading on mobile.

    When the body is tight, limit the pitch to one link. If you drop in links to several platforms at once, editors have too many options and may not click anything. Pick one destination, label it clearly – "Stream the single here" – and place it on its own line.

    If you’re sending an early or unreleased track, use a private promo link or embedded player. Promoly can host private promo links and track opens, plays, and downloads.

    End with a signature that makes replying simple. Include your full name, role – artist, label rep, or publicist – city and state, such as Austin, TX, and a contact email that you check often.

    Conclusion

    The takeaway is simple: good music magazine pitches are short, specific, and tailored to each outlet’s editorial focus. Editors at niche outlets can receive 100–200+ pitches a day, so a concise email that makes the fit obvious will beat a generic blast.

    Across all five templates, the same rule holds: customize each one to the outlet’s beat and the type of coverage you want. The three variables that matter most are the editor, the angle, and the ask. An editor should be able to see the fit and the ask in one pass.

    If the first pitch gets no reply, send one polite follow-up and then move on.

    Pick the template that fits the coverage goal, tailor it to the outlet, and send it only when the match is genuine. That’s the fastest path to better coverage.

    FAQs

    How do I choose the right pitch template?

    Choose the template based on who you’re contacting and what you want from the outreach. Go with one that gives you room to show you did your homework, like mentioning the recipient’s recent work or current interests.

    A strong template has three parts:

    • A concise intro
    • A short description of the music
    • A polite, direct call to action

    Promoly’s email template builder can help you put these pieces into a clean structure, whether you want a formal, casual, or hype-focused tone.

    What should I do if I have no press coverage yet?

    If you have no press coverage yet, don’t worry. Put your energy into credibility and real relationships instead. In your pitch, point to other wins, like:

    • playlist placements
    • a different approach to production
    • a personal milestone
    • the story behind the track

    Keep your message brief, professional, and clear. Use Promoly to send streamable links instead of attachments, then follow up once, politely, after 7–10 days. If there’s still no reply, move on and try again with your next release.

    How personal should each music magazine pitch be?

    Personalize every pitch so it doesn’t read like a mass email. Journalists and people in the industry can spot a generic template fast. And even a small custom detail can help you get more replies.

    Mention something specific about the person you’re contacting, like a recent article, playlist, or artist they featured. That shows you did your homework and makes the message feel more human. It also helps build trust.

    Related Blog Posts

  • Checklist for Collecting Campaign Feedback

    Checklist for Collecting Campaign Feedback

    Most campaign reports miss the point: numbers alone do not tell me who will support the release, which track should lead, or where to follow up first. The fix is simple: I decide what feedback I need before launch, collect it in one place, track both replies and behavior, and use the first 48 hours to make changes.

    Here’s the whole process in plain terms:

    • Set the goal first so each reply helps me make a decision
    • Ask short, structured questions like 1–5 ratings and Will Play / Maybe / Won’t Play
    • Give people 7–14 days to reply, with 1–2 reminders
    • Use one promo page, one form, and one log for each release
    • Track both feedback and behavior: opens, plays, downloads, and comments
    • Tag every response by track, region, role, sentiment, and support level
    • Review patterns fast so I can shift outreach, update subject lines, or change the lead track

    A few numbers stand out. If 60% of U.S. radio DJs score a track 4 out of 5 or higher, but only 15% of club tastemakers react well, I already know where to push harder. And if most early replies come within the first 48 hours, waiting until the end of the campaign wastes time.

    4-Step Campaign Feedback Process for Music Releases

    4-Step Campaign Feedback Process for Music Releases

    Quick overview

    Step What I do What it helps me answer
    1 Define the feedback needed before launch Which track, market, or contact group matters most
    2 Set up the form, promo page, and tracking How I collect clean replies with less drop-off
    3 Log replies and behavior in one place Who is showing interest vs. who may support
    4 Review patterns and act during the campaign What to change before the next send

    Bottom line: I do not need more data. I need usable feedback that points to the next move.

    1. Define the Feedback You Need Before the Campaign Starts

    Before you launch, get clear on what the feedback needs to help you decide. Is this campaign meant to identify the lead single, measure market support, or flag priority follow-ups? That choice shapes everything that comes next, from the form you use to the tracking setup.

    Set Campaign Goals and Response Goals

    The form should match the campaign. For club promo, ask about support choice and venue details. For radio, collect station, format, and spin data. For playlists, ask for playlist name, platform, and timing. That way, each response connects to a decision you’ll make later.

    Set three targets before launch:

    • a minimum number of usable responses
    • a response count that is large enough to show a pattern
    • a small pool of replies from top-tier contacts

    Once those targets are locked in, choose response fields that collect that data cleanly.

    Choose Structured Questions and Response Formats

    Keep the question set short. A 1–5 rating scale works well for track quality, dancefloor potential, or playlist fit. A Will Play / Maybe / Won’t Play field turns general opinion into a direct support signal. Pre-set checkboxes like Club play, Radio play, Playlist add, and Social shoutout make it easy for recipients to reply in seconds, and they map straight to support metrics you can count.

    Put ratings and support choices first. Leave comments in one optional field below.

    Set Feedback Windows and Follow-Up Timing

    Use four windows. Start with an early send to your top 10–15 contacts about one week before the main send so you can lock in early support. Then send to your broader list 2–3 weeks before the release date. Use release week for final reminders. After that, schedule a post-campaign review 2–4 weeks after release to gather late feedback and compare early Will Play pledges with actual outcomes.

    Each promo should show the deadline in clear U.S. date format. For example: "Please submit your feedback by 09/03/2026." If timing matters, include the time zone too: "Embargo lifts 08/21/2026, 10:00 AM ET." A short note like "Feedback form takes less than 2 minutes" can help as well, because people are more likely to reply right away instead of putting it off. Give contacts 7–14 days to respond, with 1–2 reminders spaced 3–5 days apart.

    With targets and timing set, the next step is choosing where feedback will come from.

    2. Set Up the Right Channels and Tracking for Feedback Collection

    Once your goals, questions, and timing are locked in, build the feedback flow before launch.

    Use Promo Pages, Forms, and Platform Dashboards

    Use an email promo page, a short feedback form, and one dashboard. Keep it to one page per release so the track, form, and tracking all connect to the same response record.

    The promo page should bring everything into one spot: the track, release details, an embedded player, and the feedback form. That way, people can listen and reply without bouncing between tabs or tools. Promoly lets labels and artists send promos, collect ratings and comments, and track opens, plays, and downloads in real time. The aim is simple: one clean record per contact, not scattered notes across different systems.

    If you need more detailed input, like A&R testing or mix comparisons, add a short standalone web survey. But keep that for A&R leads and key partners only.

    Keep Feedback Requests Short and Mobile-Friendly

    Most DJs and programmers check promos on their phones between gigs or while moving around. If the form feels clunky on mobile, people will drop off fast.

    Stick to 3–5 questions max:

    • a rating scale
    • a support choice field
    • one optional comment box

    Use unique links when you can, so details like name and email are already filled in. That makes it easier for recipients to tap, respond, and move on. Requiring feedback before download can also keep things tight; the interaction takes about 30 seconds.

    Set up automated reminders for non-openers and non-responders, and keep follow-ups to 1–2 per campaign. Only resend to non-openers and non-responders.

    Compare Feedback Channels Before Launch

    Channel Response Rate Feedback Depth Best Use Case Common Issues How to Use It
    Email promo pages Medium–high with clean lists Moderate–high (ratings, comments, support intent) Core DJ/tastemaker and radio outreach Inbox overload; deliverability issues Primary campaign channel; use unique links and track opens, plays, and downloads via your promo platform
    Web surveys Low–medium High (structured, multi-question) In-depth feedback from key partners; A&R testing Feels time-consuming; mobile drop-off on longer forms Reserve for targeted groups; keep short and mobile-optimized
    In-platform forms Medium Moderate (ratings, short comments) Integrated promos with centralized tracking Limited space for long-form feedback Use for campaigns run through a promo platform
    Social replies Low Low (unstructured sentiment) Public sentiment; fan engagement Hard to centralize; unstructured data Treat as supplementary; log manually into your feedback log weekly

    Send promos only to opted-in contacts, and include a clear unsubscribe link in every email. Unique links also make opt-outs easier to manage.

    Once the channels are live, log every reply in one place so live feedback and campaign data stay in sync.

    3. Collect and Centralize Feedback While the Campaign Is Live

    Once your channels are live, track every response as it comes in. That way, you can act before the campaign wraps up, not after.

    Capture Both Direct Feedback and Behavior Data

    Direct replies tell you more than passive engagement. A few opens or one play show some interest. But a download plus a "Will Play" pledge tells a very different story.

    Direct feedback should include structured ratings, written comments, Will Play / Maybe / Won’t Play decisions, and any venue, radio show, or playlist details people share. Engagement data – opens, plays, downloads, and click-throughs from your promo pages – helps you see who is actively interacting and who is just getting your emails.

    The key is to read both signals together. If a DJ opens, plays, downloads, and replies "Adding this to my Friday night set", that’s a strong supporter. If someone opens once and never plays the track, interest is probably low.

    When you pair those signals, tagging responses gets much easier.

    Tag Every Response So It Can Be Sorted Later

    As replies come in, sort them by the fields that matter most. Tag each one using the same labels every time: campaign, track, region, contact type, sentiment, and support level.
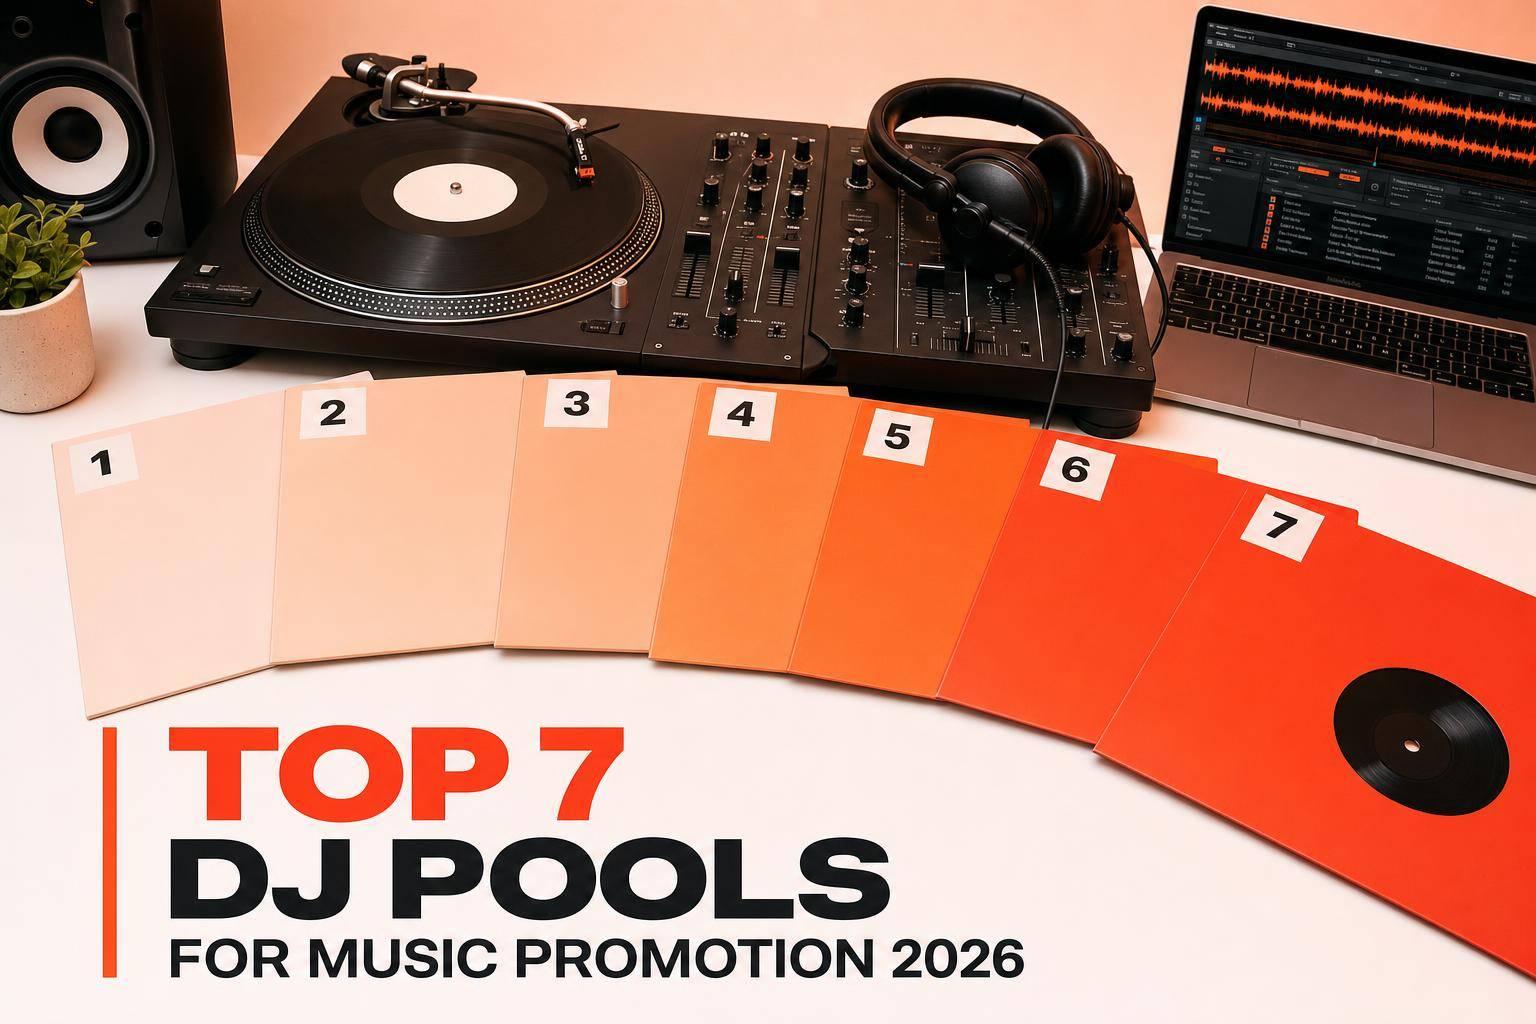
    This setup makes filtering fast. For example, if you filter by "Club DJ" + "Club Play" + "Strong Positive", you’ll surface your hottest supporters in that lane. Filter by "Radio Host" + "Los Angeles, CA", and you can check local radio traction in seconds.

    Build One Clean Feedback Log

    Use one row per recipient per campaign, and attach every response to that row. Here’s the core set of fields to track:

    Field What to Record
    Recipient Name Full name of the contact
    Role Club DJ, Radio Host, Playlist Curator, Journalist, Internal
    Region City, State (e.g., Chicago, IL)
    Date MM/DD/YYYY format
    Opens / Plays / Downloads Count of each engagement action
    Rating 1–5 scale
    Support Status Will Play / Maybe / Won’t Play / Playlist Add
    Support Quote Their exact words, copied verbatim
    Support Type Club Play, Radio Rotation, Playlist Add, Press Coverage
    Follow-Up Status Pending / Sent Remix Pack / Needs Reminder / Complete

    Pull live opens, plays, downloads, and feedback into the log as responses arrive. A clean, live log helps you spot winners, weak spots, and follow-up priorities while the campaign is still moving.

    Update the log daily or twice a week during active campaigns. And if a contact’s support changes, update that row right away.

    4. Review Feedback and Turn It Into Campaign Actions

    Find Patterns That Affect Campaign Performance

    Once your log is filled out, the job changes. Now you need to sort signal from noise.

    A single DJ saying "the intro is too long" is just one opinion. But if several DJs in different markets say the same thing, that’s a pattern you can act on. At that point, the feedback stops being random commentary and starts looking like market research from the people who can help a release land.

    Start by splitting feedback by role before you make any calls. DJ feedback tells you about dancefloor fit, set usability, and possible mixing issues. Journalist feedback tells you whether the release has editorial appeal and whether there’s a story worth covering.

    Then compare ratings against behavior data using the fields you logged – role, region, support status, and behavior data. A reply tied to a full listen and a download should carry more weight than a high score from someone who only opened the email and did nothing else. If plays are high but downloads stay low, that often points to interest without a good fit for that format.

    Region and genre matter too. If one market or one segment reacts much better than another, that’s a strong hint to tighten your targeting and put more time and budget toward the contacts most likely to respond.

    Use Results to Adjust the Campaign Quickly

    The first 48 hours of feedback often tell you how the release is likely to perform overall. That’s the window where changes still matter most.
    Low open rates usually point to a subject line issue. The hook didn’t land. High plays with low downloads can mean the content got attention, but it wasn’t quite right for that person’s platform or use case. Repeated comments about one track on an EP can also shift your plan. Sometimes the track you picked as the lead isn’t the one people react to most. If several DJs rate the same deep cut higher than your planned A-side, pay attention.

    Make the changes while the campaign is still moving:

    • Shift outreach toward the regions showing the strongest support
    • Update subject lines for the batches you haven’t sent yet
    • Move high-engagement contacts into a priority follow-up group
    • Reallocate ad spend toward the format or genre segment getting the best response

    Do that before the next send goes out.

    Run a Post-Campaign Review and Wrap-Up

    When the campaign ends, compare the final results with the goals you set before launch. Did you hit your response targets? Which contact segments gave you the most useful feedback? Where did engagement fall off?

    During the review, sort feedback by what it tells you, not just by how much of it you collected. This is where each type earns its place:

    Feedback Type Examples Use
    Structured Star ratings (1–5), multiple-choice questions like "Would you play this?", forms When deciding on lead singles or comparing genre performance across large lists
    Unstructured Written comments, emails, social media reactions When troubleshooting track structure or refining direction
    Behavioral Open rates, play duration, download counts To check whether ratings line up with actual engagement

    Then follow up with your strongest supporters. Reach out personally to any DJ or journalist who gave strong feedback or said they’ll use the track in a set. Update your contact list by tagging steady contributors as high-priority, and re-segment contacts who keep downloading without ever engaging. Log the winning signals, weak spots, and follow-up priorities so the next campaign starts from a better place.

    Conclusion: Keep a Simple Feedback Process for Every Release

    These four steps work because they give you a repeatable process: define what you need, make it easy for people to respond, log everything in one place, and act while the campaign is still live.

    The bigger risk is inconsistency. If you change the questions, tags, or timing from one release to the next, it becomes hard to compare results in any useful way.

    That kind of consistency only happens when every response goes into one log. A lean setup – one or two questions, one promo link, and one shared log – keeps each release easy to compare. Promoly can centralize opens, plays, downloads, ratings, and comments in one place.

    Once the process is repeatable, the payoff builds with each release. The goal is consistency, not perfection. If you use the same process every time, you start to see what works, who responds, and where to focus next.

    FAQs

    How many responses are enough to spot a real pattern?

    Don’t put too much weight on one review. A single negative comment doesn’t automatically mean a track missed the mark.

    Instead, watch for patterns across several responses, and compare feedback over three or four releases. After a while, you’ll get a much clearer sense of what keeps landing with your audience.

    What should I do if contacts open the promo but don’t respond?

    Keep your follow-up simple and professional. Send one brief, polite follow-up email five to seven days after your first outreach. The goal is straightforward: confirm they received it and let them know you’re happy to help.

    If there’s still no reply, don’t send another follow-up. At that point, it’s better to move on and put your energy into the next release. If it makes sense for your process, Promoly’s automated reminders and campaign dashboard can help you reconnect with contacts and spot the people who are engaging most.

    How do I decide whether to change the lead track mid-campaign?

    Base the decision on feedback and engagement data from your promo campaign in Promoly. Pay close attention to patterns in star ratings and written comments from DJs, journalists, and tastemakers.

    If the same track keeps coming up as the standout, that’s a strong signal. And if your planned single is getting tagged as the weakest cut on the EP, it may be time to change course and push the track earning the best response instead.

    Related Blog Posts

  • Ultimate Guide to Collaborative Music Campaigns

    Ultimate Guide to Collaborative Music Campaigns

    Most music collabs fail for simple reasons: unclear splits, mixed approvals, and no shared timeline. If I want a joint release to work, I need to lock rights first, pick the right partner, assign one owner per task, and track results from pre-save to post-release.

    Here’s the short version:

    • Start with one goal. I need to decide if the campaign is for audience growth, lower costs, ticket sales, social activity, or fan response.
    • Pick the right collab type. Features, remixes, co-releases, split singles, and cross-promo each fit a different goal.
    • Set terms before promo starts. That means master splits, publishing splits, credits, billing order, approvals, budget control, and posting rights.
    • Use one calendar. Most joint releases work best with a 6–8 week pre-release window and 4–6 weeks after launch.
    • Give each task one owner. Label, artist, manager, and publicist each need clear jobs so no one duplicates work.
    • Keep one approved asset folder. Artwork, links, captions, video cuts, metadata, and press files should all live in one place.
    • Track every channel. Pre-saves, open rates, clicks, downloads, first-week streams, saves, and press pickups show what is working.
    • Keep pushing after release. The first 24–48 hours matter, but follow-ups, milestone posts, remixes, and fan clips often extend the life of the campaign.

    A few numbers stand out:

    • Upload music 4–8 weeks before release
    • Pitch Spotify editorial about 3–4 weeks out
    • Launch pre-save links about 3–4 weeks before release
    • Review results daily during launch week, then weekly after that

    Quick Comparison

    Collaboration format Best use Main metric
    Feature or remix Reach new listeners Streaming lift, monthly listeners
    Co-release Split cost and workload Spend vs. results
    Split single Share release costs around one track Pre-saves, merch sales
    Co-hosted event Drive fan turnout Ticket sales, attendance
    Social cross-promo Boost social response Follower growth, shares

    My takeaway: a strong collaborative music campaign is less about hype and more about clear paperwork, one plan, one asset system, and clean reporting. If I set those pieces up early, I give the release a much better shot.

    Choose the Right Partner and Lock the Terms Early

    Evaluate Partner Fit by Audience, Activity, and Promo Value

    The biggest mistake in partner selection is chasing follower counts. Engagement matters more. A big audience looks nice on paper, but if people aren’t listening, commenting, or sharing, that number doesn’t help much.

    Instead, look at audience overlap, release consistency, and follow-through. Spotify’s "Fans also like" is a fast way to check whether your audiences line up. It’s not fancy, but it gives you a solid gut check. If the crossover isn’t there, the collab can feel forced.

    Activity matters too. Partners who put out music on a steady schedule often keep better release momentum. If someone disappears for months at a time or only drops music now and then, that’s a warning sign. In many cases, those same gaps show up later as missed deadlines, slow replies, or last-minute changes.

    Promo effort matters just as much as audience size. Before you lock anything in, confirm that the partner will support the release with scheduled posts, links, and content on their own channels – not just add their name to the credits. If someone says they’ll “post later” but won’t commit to dates, that can turn into a headache right when the release needs the most push.

    Criteria Strong Partner Fit Red Flag
    Audience Clear overlap in "Fans also like" Large following, no genre crossover
    Engagement Active comments and real interaction High follower count, low likes/comments
    Release Consistency Music every 4–6 weeks Sporadic or inactive release history
    Promo Value Commits to pre-saves and posts on schedule Reluctant to post or vague about timing
    Values Shared artistic vision and themes Misaligned brand image

    Agree on Credits, Splits, and Decision Rights

    Even a strong partner fit can fall apart if approvals and timing are fuzzy. Once you know the fit is right, put the terms in writing. Don’t leave this stuff to text threads and memory.

    A split sheet should cover royalty allocations, neighboring rights, billing order, and credits. Also check that billing order and credits are entered the right way in the distributor dashboard, so the release shows up correctly across platforms.

    Money is only part of it. You also need clear decision rights. Spell out who has final say on artwork, captions, campaign timing, and any content that needs review before release. That saves a lot of back-and-forth when things get busy.

    It also helps to put posting schedules in the agreement itself. Use specific dates and times, not loose windows. If the label, publicist, or manager is handling different parts of outreach, define those lanes clearly. Assign exact post dates, times, and outreach owners so contacts don’t overlap.

    Once the terms are locked, build the week-by-week release plan.

    Build the Campaign Timeline and Assign Responsibilities

    Music Collab Campaign Timeline: Week-by-Week Release Plan

    Music Collab Campaign Timeline: Week-by-Week Release Plan

    Collaborative campaigns fall apart fast when each team is working from a different calendar. The fix is simple: use one shared timeline and give every task one clear owner before promo begins. Start with the release date, then build backward.

    Week-by-Week Release Plan from Setup to Launch Day

    Work backward from the release date. First, lock the master, artwork, metadata, and rights details. Then stack promo tasks week by week. For most collab releases, a workable timeline starts 6–8 weeks before release and runs for 4–6 weeks after launch.

    Week Key Milestones Primary Owner
    T-8 to T-6 Finalize the master; assign ISRC/UPC; collect metadata, credits, and split information; commission artwork; confirm campaign deliverables and approval deadlines Label / Artist / Manager
    T-6 to T-4 Approve artwork and metadata; deliver to the distributor; confirm distributor delivery and store submission; submit the DSP editorial pitch; set up pre-save links and smartlinks Label / Distributor / Manager
    T-4 to T-2 Publish teaser content; build the social calendar; begin press outreach; send the first DJ and tastemaker promo wave; brief creators Artist / Publicist / Label / Manager
    T-2 to Launch Day Release final visual or trailer content; run countdown posts; send email and fan community updates; start paid ads; coordinate release-day assets Artist / Label / Manager / Publicist
    Post-Release (Weeks 1–6) Track performance; share press coverage; keep social content going; celebrate milestones; plan remixes or follow-up collaborations Manager / Artist / Label

    Most distributors suggest uploading the release 4–8 weeks before launch so there’s time to catch and fix metadata problems. Spotify editorial pitching tends to work best 3–4 weeks out, while the minimum technical window is 7 days. Pre-save campaigns should usually go live about 3–4 weeks before release.

    Roles for Label, Artist, Manager, and Publicist

    Once the timeline is locked, assign one owner per task. No shared ownership. No vague handoffs. If everyone owns it, no one owns it.

    Here’s the basic split:

    • Label: distributor communication, metadata, DSP pitching, paid ads, and reporting
    • Artist: teaser content, fan engagement, and direct pre-save promotion
    • Manager: timeline control, partner outreach, and approval flow
    • Publicist: press outreach, follow-ups, and coverage tracking

    The next problem is duplicate work. One person emails the same outlet twice. Someone posts old artwork. A deadline slips because each team thought someone else had it. That’s why every owner should be tracked in one shared document, with deadlines reviewed every week.

    Coordinate Assets, Channels, and Campaign Tracking

    Once ownership is clear, the next thing that can go wrong is simple: people use different files, different links, and different timing.

    That’s how campaigns get messy. A partner uploads old artwork. Someone shares a broken smartlink. Another person posts a graphic that looks wrong on mobile. Those aren’t big artistic problems. They’re coordination problems.

    After the timeline is locked, keep every approved asset in one folder. That way, everyone pulls from the same source.

    Build One Shared Asset Package for Every Channel

    Set up one shared folder that the label, lead artist, co-artist, manager, and publicist can all access. Inside it, use subfolders for artwork, audio, video, social graphics, press materials, email assets, metadata, and event graphics.

    The point is simple: one approved folder means one version of the campaign. No outdated art. No off-message copy. No guessing.

    Be strict with specs. Cover art should be 3,000 × 3,000 px in RGB as a JPEG or PNG, with no URLs, social handles, or pricing text. For video, export a watermark-free 9:16 master first. Then make square and 4:5 crops for feed posts and Stories. Don’t stretch one design across every platform and hope it works. Build each size for the place it’s going.

    Once the package is approved, every channel should use it. This table shows who handles what, so work doesn’t get duplicated and nothing gets missed:

    Channel Label Lead Artist Co-Artist Manager Publicist
    Email / Promo Send DJ and tastemaker promo; manage sender profile and tracking Provide updated bio and press photo Provide updated bio and press photo Confirm send schedule and approvals Review messaging before send
    Smartlinks Generate and update pre-save and streaming links Add link to Instagram/TikTok bio and YouTube description Cross-post link to bio; share in newsletters Confirm links are live before posting Include link in press kit and pitches
    Social Media Post official announcement and high-res artwork Share short-form video edits; run pre-save reminders Share behind-the-scenes content; tag all partners Coordinate posting sequence and timing Share coverage links and press quotes
    Press / PR Distribute press kit; pitch exclusive premieres Available for interviews or guest features Available for joint interviews or social takeovers Coordinate interview scheduling Lead all press outreach and follow-ups
    Events Manage ticket tiers and venue details Promote show dates to local fanbase Promote appearance as special guest or co-headliner Confirm logistics and deadlines Pitch event to media and listings

    Before launch, set the embargo and posting order. Be specific about who posts first, which time zone sets the schedule, and whether co-artists can post at the same time or need to wait for the label’s announcement.

    Track Opens, Plays, Downloads, Pre-Saves, and Feedback

    Every campaign link – social posts, promo sends, email sends, and press outreach – should use tags tied to source, partner, and channel. Use the same tag format every time. If naming gets sloppy, reporting gets sloppy too.

    For DJ and tastemaker outreach, Promoly can send promo campaigns, collect feedback, and track opens, plays, and downloads in real time.

    Campaign Stage Key Metrics What the Data Tells You
    Pre-Release (Weeks 3–4) Pre-saves, promo open rates, click-throughs Low opens = weak subject line; low saves = move the CTA higher
    Launch Week Smartlink clicks, downloads, conversion rate Compare pre-save count to first-week streams to measure fan follow-through
    Post-Release Plays, DJ feedback ratings, media pickups Positive feedback becomes social proof for press and future pitches
    Ongoing Outreach Reminder engagement, list bounce rate High bounces = list hygiene needed; low reminder opens = reconsider timing

    Check metrics every day during launch week, then switch to weekly reviews after release. Share a short recap with every partner that shows which channel, partner, and piece of content got the best response. That recap should guide the next push, including which content to reuse and which partners should lead the next round.

    Review Results and Extend the Collaboration After Release

    Use Post-Release Content and Milestones to Keep Momentum Going

    After launch, the job changes. At this stage, stop focusing on scheduling posts and start looking at conversion and retention.

    On release day, swap pre-save links for live streaming pages. Then check the first 24–48 hours of plays, saves, and click-throughs. Stick with the same tagged links and channel tracking you used during launch week so the numbers stay easy to compare. In that early window, full plays and saves can tell platform algorithms that the track deserves more reach.

    Post-launch updates should reward people who already showed interest. They shouldn’t reopen cold outreach from scratch. Instead of sending a vague follow-up, send something specific: chart movement, a live set placement, or a remix. A good timing window is one week after the first promo send, then a second attempt two weeks later. If someone played several tracks all the way through or downloaded the press kit, move them to the top of the list for a personal note.

    Keep post-release content moving by reusing approved assets like:

    • behind-the-scenes clips
    • joint posts
    • fan challenges

    As you do that, watch for new followers coming in from the partner’s audience. That’s a simple way to see whether the collaboration reached past your current base.

    Once the first reporting cycle is done, document what converted and use those same channels again on the next release.

    Conclusion: What Strong Collaborative Campaigns Have in Common

    Strong collaborative campaigns usually hinge on three things: clear terms set before any asset goes live, coordinated execution with one owner for each task, and measured follow-through that shows what worked.

    Give one person the job of watching results, another the job of handling follow-ups, and another the job of choosing the next content push. That record is what separates teams that learn from teams that just run the same play again.

    FAQs

    How do I choose the right collaborator?

    Prioritize collaborators who match your brand values, musical style, and target audience. The best partnerships feel natural, not forced. When both sides share similar goals and themes, fans are much more likely to connect with the work.

    Before you commit, take a close look at their social media presence, audience demographics, and past project performance. You want a partnership that works for both sides, where each person can share resources and co-create content to grow reach.

    What should we agree on before promotion starts?

    Before you launch a collaborative campaign, get everyone on the same page about shared goals and clear roles. That way, each person knows what success looks like and what they’re responsible for.

    It also helps to line up the timeline, outreach plan, and creative direction early. On the admin side, confirm key assets like metadata, ISRC codes, and ownership splits. A little prep here can save you from duplicate work, mixed signals, or disputes later.

    How do I measure if a collab campaign worked?

    Measure success by looking at actionable engagement across every partner network, not vanity metrics. With Promoly, you can track opens, plays, downloads, save rates, pre-save conversions, and feedback to see how tastemakers and fans responded.

    Check results on day 1, day 3, day 7, and day 30. Then compare pre-saves to first-day streams, and use ratings and comments to spot patterns and improve future campaigns.

    Related Blog Posts

  • How to Spot Key Tastemakers in Music

    How to Spot Key Tastemakers in Music

    More than 120,000 tracks hit streaming platforms each day, so I don’t look for the biggest names first. I look for the people who get listeners to act.

    If I want a release to get streams, press, airplay, bookings, or social traction, I start with four steps:

    • Define the release clearly by genre, crossover sound, scene, and timing
    • Group tastemakers by job such as curators, writers, radio hosts, DJs, promoters, podcasters, and creators
    • Check influence with proof like engagement, repeat support, niche focus, and response history
    • Rank contacts before outreach so time and promo spend go to the best-fit names

    The main idea is simple: fit beats size. A small outlet with the right audience can do more than a large account with weak interest. I also need a working contact path, clear submission rules, and a way to track opens, plays, downloads, and feedback after I send promos.

    This article breaks that process into a short, usable system I can apply to one single, EP, or album cycle.

    How to Find & Rank Music Tastemakers: A 4-Step System

    How to Find & Rank Music Tastemakers: A 4-Step System

    How to Approach Tastemakers for Music Reviews & Build Hype for Your Music Releases

    1. Start with Your Genre, Scene, and Release

    Start with one release, not your whole artist brand. A single, EP, or album cycle gives you a much sharper filter: does this tastemaker support music like this, right now?

    Match the Release to a Clear Genre Lane

    Begin by naming your primary genre plus one or two crossover descriptors. “Hip-hop” is too broad. “Emo rap with lo-fi production” is a lane. “House” is too broad too; “jackin’ house” or “deep house” gives you something you can actually use. Tastemakers build their reputation around a specific sound, so off-target pitches usually get ignored.

    Use that genre lane to find nearby releases. Put together a short reference playlist with 5–10 similar tracks. Then check the genre labels on Spotify and Apple Music, and pay attention to the terms that show up again and again. That’s the language to bring into your pitch.

    Scene and timing matter too. The U.S. has roughly 600 college radio stations, with about 300 reporting to the NACC chart. If your release fits indie, alternative, or emerging hip-hop, go after those stations 4–6 weeks before a semester starts. Summer often works better for festival-friendly and upbeat music. Late Q4 gets crowded with major releases and holiday music, which can bury smaller campaigns. Scene shows up in local radio, shows, playlists, and venue flyers, so use those as early signs of where your release fits.

    Build a Starting List from Existing Support Patterns

    Next, trace who already supports artists like you. The fastest way to find relevant tastemakers is to follow the support trail of adjacent artists – acts one tier above you with a similar sound and audience. Check who appears in “Fans Also Like” on Spotify, scan playlist tracklists that include your reference tracks, and read press coverage of artists you admire to see which names keep popping up.

    What matters most is repeated support, not a one-off mention. A blog that keeps covering similar artists is building a clear story around your scene. The same idea applies to radio shows, podcast hosts, DJ charts, and event promoters. If the same name shows up across playlists, radio archives, and venue flyers, move it to the top of your list.

    2. Match Tastemaker Types to Your Release Goals

    Now that you have a starting list, sort each name by the role it can play for this release. Tie every contact to the outcome you want: streams, press, airplay, bookings, or social lift. The idea is simple: use the right contact for the job, then double-check fit and the best way to reach them.

    Playlist Curators, Journalists, and Radio Hosts

    Playlist curators are your best bet for stream volume and online discovery. Playlists drive over 80% of all streams on Spotify. So this group can have a huge effect on how far a release travels. When you size up a curator, check for regular updates, a clear genre lane, and signs that listeners respond to new adds.

    Journalists help frame the story around your release and add credibility. Put your focus on writers who cover your genre on a steady basis. If someone only dips into your lane once in a while, they’re usually a weaker fit.

    Radio hosts work best for regional credibility and hand-picked airplay. Send promos 3–4 weeks before release, and include a clean edit if the track is explicit. That same basic approach carries over to DJs, promoters, podcasters, and social creators too, but each group looks for a different kind of signal.

    DJs, Promoters, Podcasters, and Social Creators

    These contacts matter when streams aren’t your only target.

    Club DJs give you direct feedback on how a track lands in a room. That kind of response can tell you a lot, fast. Split them by sub-genre and venue type, and make sure your metadata – artist name, track title, label, and release date – is complete.

    Promoters often look at release momentum when making booking calls. Reach out with mixes or live recordings months before festival season, when many booking decisions are being locked in.

    Podcasters can open the door to niche discovery through interviews and dedicated music segments. Look for strong interview depth and clear audience engagement.

    Social creators on TikTok and Instagram Reels can move fast. They’re often the quickest path to reach, but don’t get distracted by follower count alone. Put more weight on engagement and audience fit.

    Tastemaker Where to Find Them Key Signals
    Playlist Curators Spotify, YouTube, SoundCloud Update frequency, genre fit, listener engagement
    Journalists Music blogs, niche publications Consistent genre beat, coverage history
    Radio Hosts College stations, community radio Airplay history, reporting system usage
    Club DJs DJ pools, clubs, festivals Download rates, track ratings, tempo fit
    Promoters Local venues, festival booking offices Gig history, mix engagement
    Podcasters Podcast directories, music shows Audience engagement, interview depth
    Social Creators TikTok, Instagram, Discord Engagement-to-follower ratio, niche trust, user-generated content

    Once you’ve matched names to goals, check which contacts have actual influence and a clear, usable contact path.

    3. Check for Real Influence, Fit, and Contact Paths

    Look Beyond Follower Count When Checking Influence

    Now that you have a shortlist, the next step is simple: figure out who can actually move attention for this release.

    Follower count helps, but it’s only a starting point. What you want is repeatable response. When this person backs a track, do people listen, click, comment, save, or follow?

    A good place to start is engagement rate. Take total interactions, divide by follower count, and multiply by 100 across 10–12 recent posts. That gives you a much better read than raw audience size alone.

    Then look closer at the comments. Emoji-only replies often point to weak engagement. Read at least 20 comments across a few posts. You’re looking for specific, content-related responses from different accounts. If the replies are full of zero-follower profiles or accounts that look automated, that’s a red flag.

    Consistency matters too. Go back 6–12 months and review posts, playlists, or episodes. Is there a steady genre focus? Do they post on a regular cadence? If more than 80% of their last 30 posts sit inside one clear niche, that’s a strong sign that they hold real authority in your lane.

    Past results matter even more. Check whether support for similar artists led to bumps in streams, followers, or engagement around the date of that support. That’s the clearest sign that influence turns into action.

    Confirm Contact Details and Submission Preferences

    Once someone looks like a fit, make sure there’s an actual way to reach them.

    Look for one current submission path, such as:

    • email
    • form
    • hub
    • DM instructions

    Then verify that the contact path still works. Check post dates, make sure linked forms are live, and see whether the website has been updated lately. Also confirm their genre preferences. Many curators and DJs spell this out in Spotify playlist descriptions, SoundCloud pages, or social bios.

    If they ask for a certain subject line, file type, or a private streaming link instead of a download, follow that exactly. Miss the instructions, and it’s easy to get ignored.

    At this stage, keep only the contacts that have both a clear fit and a usable way in. Then sort them by priority.

    4. Organize, Rank, and Prepare for Outreach

    Build a Tiered Shortlist with Notes and Priority Levels

    Once you’ve confirmed fit and a clear contact path, the next step is simple: rank the list by likely impact.

    Score each contact from 1–5 across these areas: genre fit, support history, audience quality, contact clarity, and impact vs. effort. Then sort them into three tiers. Use 18–25 for Tier 1, 10–17 for Tier 2, and 0–9 for Tier 3. A solid rule of thumb is to keep the split around 20%–30% Tier 1, 40%–50% Tier 2, and the rest Tier 3.

    That way, your outreach matches the chance of a result:

    • Tier 1 gets custom pitches and direct follow-up
    • Tier 2 gets lightly personalized outreach
    • Tier 3 gets short, relevant outreach after higher-priority contacts are done

    Keep everything in one shared sheet so ranking and contact details live in the same place:

    Field What It’s For
    Name / Handle Personalization in outreach
    Role Tailor the pitch (DJ vs. journalist vs. curator)
    Region / Primary Market Helps prioritize key markets for touring or press
    Tier Drive sequencing and effort allocation
    Genre Tags Filter by release quickly
    Contact Method Standardize outreach and avoid wrong channels
    Activity Status Prevent over-contacting and track relationship freshness
    Support History Notes Inform future pitches with past context

    Before each new release, review your Tier 1 and Tier 2 contacts. Check that their role still fits, their contact details still work, and they’re still active. If someone has gone quiet or shifted focus, take them out. A shorter list with the right people beats a bloated one every time.

    Use a Promo Workflow That Tracks Opens, Plays, Downloads, and Feedback

    After ranking the list, track how each tier responds. That’s how the list gets better from one campaign to the next.

    Once your list starts to grow, it helps to use a promo platform that does more than send links. Promoly lets you send segmented promo campaigns and track opens, plays, downloads, and feedback in real time. If someone plays a release more than once, that’s often a sign of interest. That’s usually the right moment for a personal follow-up. Over time, response data shows which tastemaker types actually help move your release.

    Promoly also collects star ratings and written feedback from tastemakers. That gives you useful notes you can log right into your contact sheet. If a DJ leaves a 4/5 rating and asks for a radio edit, that’s not just feedback for today. It’s context you can use on the next release too. Automated reminders also help keep follow-up on track.

    After each campaign, use engagement data to adjust your tiers. Contacts who keep opening, playing, and downloading can move up. Contacts who never engage can move down or come off the list.

    Conclusion: Focus on Patterns, Fit, and Follow-Through

    After you rank your list, keep the focus on fit, not volume. The core rule is simple: match the release to the tastemaker’s audience, role, and response history. Different release goals call for different types of tastemakers. Match first; outreach later.

    A smaller, highly engaged niche contact is often better than a large but indifferent one. Fit comes first. Proof of influence comes next.

    It also helps to look for repeat support across releases and channels. One placement is nice, but steady backing tells you a lot more.

    Once the list is checked, the last step is straightforward: follow through fast and track the response. When a tastemaker backs your release, thank them directly, share their feature on your own channels, and log the outcome. Use a promo workflow tool like Promoly to track opens, plays, downloads, and feedback. Thank, share, and log each result so every release starts with better context.

    If the release is defined, the match is clear, influence is verified, contact paths work, and the list is ranked, the campaign is ready.

    FAQs

    How many tastemakers should I target first?

    Start with quality over quantity. In many cases, just five well-chosen, well-researched tastemakers are enough to get things moving.

    For niche campaigns, a focused list of 150 to 300 active, genre-specific contacts often does better than a generic list of 1,000. The goal isn’t the biggest list you can build. It’s getting in front of people who are likely to care, respond, and help spread the word.

    Put simply: prioritize engagement over broad reach.

    What makes a tastemaker worth pitching?

    A tastemaker is worth pitching when they’re active, match your genre or subgenre, and already support music like yours. Size and fame matter less than fit. If someone has a real interest in your sound, you’re much more likely to get honest engagement and support that lasts longer than a one-off play.

    That’s why it helps to do a little homework. Check their tracklists. Watch what they post and share on social media. See who they’ve backed before. You’re not just looking for a big name – you’re looking for someone who makes you think, yeah, this person would actually get this track.

    Promoly can help here too. Use it to group contacts by genre and engagement, so your outreach feels more targeted instead of scattered. In practice, the tastemakers that matter most are often the ones who keep opening your emails, listening to your music, and sending feedback.

    When should I start outreach before release day?

    Start your outreach before release day. That gives tastemakers enough time to listen, decide if they want to cover the track, and fit it into their schedule.

    A simple timing guide:

    • Blogs, online publications, and independent playlist curators: 2–4 weeks ahead
    • Print magazines: 2–3 months ahead
    • Editorial playlists like Spotify: 7 days to 3 weeks ahead

    Promoly can help you track opens and feedback during the campaign.

    Related Blog Posts

  • Top 7 DJ Pools for Music Promotion 2026

    Top 7 DJ Pools for Music Promotion 2026

    If I had to cut this guide down to one point, it’s this: the best DJ pool is the one that matches your genre, gives you usable feedback, and fits your release schedule.

    I’d look at four things first: DJ audience, artist/label access, file support, and reporting. That’s the fastest way to sort these seven options without getting lost in feature lists. Prices for entry plans usually sit around $10 to $25 per month, and the right choice depends less on pool size and more on who actually hears your track.

    Here’s the short version:

    • Promoly: best for direct promo, tracked opens/plays/downloads, and required ratings/comments
    • ZipDJ: best for genre-based DJ targeting
    • DJcity: best for planned campaigns with early submission
    • BPM Supreme: best if you want a club/radio DJ base, though info here is limited
    • Digital DJ Pool: best for simple pre-release uploads
    • Heavy Hits: best for early genre-matched feedback
    • Crate Connect: best for DJ-ready files, metadata, and clean delivery

    You should also send the right assets:

    • WAV and/or high-quality MP3
    • Clean, explicit, and extended versions
    • Artwork, BPM, key, genre, and UPC
    • A short promo note with release context

    And timing matters. I’d submit a few weeks before release day, not during release week. That gives DJs time to listen, test the track, and respond.

    Your Guide to the Top DJ Record Pools of 2025

    Quick Comparison

    Top 7 DJ Pools Compared: Features, Access & Best Use Cases (2026)

    Top 7 DJ Pools Compared: Features, Access & Best Use Cases (2026)

    Platform Best For Access Style Main Tradeoff
    Promoly Direct outreach and tracking Push-based sends Less like a classic browse pool
    ZipDJ Genre-specific DJ reach Browse-and-download Less direct feedback detail
    DJcity Curated DJ discovery Review-based Needs more lead time
    BPM Supreme Club and radio DJ reach Browse-and-download Light campaign data
    Digital DJ Pool Simple promo delivery Browse-and-download Basic reporting
    Heavy Hits Early feedback in a clear genre lane Browse-and-download Smaller DJ base
    Crate Connect DJ-ready files and metadata Browse-and-download Limited reporting

    My takeaway: use a DJ pool for reach, then pair it with direct outreach if you want cleaner data and follow-up. That gives you both discovery and measurable response from the same release.

    What Labels and Artists Should Look for in a DJ Pool

    When you compare DJ pools, keep it simple: look at audience fit, promo access, file support, and reporting. Those four filters will help you judge the seven pools below without getting distracted by flashy feature lists.

    DJ Audience and Genre Coverage

    DJ pools usually serve specific lanes: club DJs, radio DJs, open-format/mobile DJs, and tastemakers. That matters a lot.

    A huge pool might sound good on paper. But if the DJs inside it don’t play your kind of music, size doesn’t mean much. Genre fit matters more than pool size because DJs respond to tracks that match what they already play. That’s why audience segmentation helps keep promos relevant.

    Start here when comparing the seven pools below.

    Think about where your release belongs. Electronic and club-focused tracks tend to do better in pools with strong ties to club-chart-focused promotion and club bookings. Pop or hip-hop releases may work better with radio reach and open-format DJs.

    Promo Access for Labels and Independent Artists

    Not every pool works the same way. Some are self-serve and open to independent artists. Others lean more toward labels and use a manual approval process.

    If you’re an indie artist or a small label, you probably don’t want extra friction just to launch a campaign. A good setup lets you move fast and stay in control.

    Look for things like:

    • Self-serve submission
    • Multi-profile management
    • Gated download access that requires a rating or comment

    That last point can make a big difference. If DJs need to leave a rating or comment before they download, you get more than file delivery – you get a read on how the release is landing.

    File Types and DJ-Ready Versions

    High-quality audio is the starting point. WAV and high-quality MP3 files are the standard expectation.

    But format alone isn’t enough. The versions you upload matter just as much. DJs often need different edits depending on where they’re playing, so giving them options makes your release easier to use.

    Useful versions often include:

    • Clean edits
    • Explicit versions
    • Extended mixes

    Pools that support multiple file versions per release tend to be more helpful for labels, since they let you package one track for more than one use case.

    Reporting, Charts, and Feedback

    Data is what turns a promo campaign into something you can learn from. Without it, you’re mostly guessing.

    Look for reporting on opens, plays, downloads, ratings, and feedback comments. Each metric tells you something different. Opens show interest. Downloads show intent.

    That kind of data helps you make smarter calls on the next release – who to target, which pool to use again, and where the traction is coming from. The best pools make all of those metrics easy to track in one place.

    1. Promoly

    Promoly

    Promoly is built for sending DJ promos, gathering feedback, and tracking engagement in real time. It’s used by 500+ labels worldwide and reports an average open rate of 73% across campaigns.

    Genre Fit and DJ Audience

    Promoly’s opt-in DJ and tastemaker network includes 1,300+ DJs and industry pros across 20+ genres. The contact base is updated on a regular basis so lists stay active and relevant.

    Label or Artist Promo Access

    This platform works for solo artists, indie labels, publicists, and larger label teams. Plans scale from single-user access to enterprise teams, and every plan comes with a 7-day free trial and 150 sends.

    A nice touch: campaign profiles let publicists and label groups manage multiple brands or clients from one dashboard. Promoly AI can help write promo copy, find fitting contacts, and automate follow-ups.

    File Quality and Edit Types

    After you’ve picked your audience, format matters. Promoly supports WAV and MP3 uploads, along with artwork and press release attachments.

    Feedback, Charts, or Campaign Data

    The big draw here isn’t just sending promos. It’s seeing what happens after the send. Recipients have to rate and comment before they can download, which gives labels and artists a cleaner feedback loop. On top of that, real-time tracking shows opens, plays, and downloads.

    If you need deeper reporting, the Pro and Premium plans include advanced analytics.

    For labels that want similar outreach with a different audience mix, the next pools lean into other DJ-focused options.

    2. ZipDJ

    ZipDJ

    ZipDJ works well for releases that need targeted access to vetted DJs in a specific genre. If your track sits in a clear lane and you want to get it in front of DJs who already play that style, ZipDJ is a smart pick. If you’re after a more commercial mix of DJs, the next option is DJcity.

    Genre Fit and DJ Audience

    ZipDJ sorts its network by genre, which makes it a good match for releases with a defined sound. That setup helps you reach DJs who are already active in that space instead of throwing your release into a broad pool.

    Because DJs on the platform are vetted, the audience stays more relevant and focused.

    Label or Artist Promo Access

    ZipDJ gives both labels and independent artists direct access to its DJ network. You don’t need a major-label tie-in to run a campaign, which makes it easier for indie teams to get started.

    File Quality and Edit Types

    ZipDJ supports multi-format downloads. That gives DJs room to grab the version that works best for their setup, whether they need one format for club play and another for their library.

    Feedback, Charts, or Campaign Data

    Before you submit, check which engagement metrics ZipDJ makes available. That way, you’ll know what signals to watch and whether the campaign is helping move the release forward.

    3. DJcity

    DJcity

    DJcity is a better fit for teams that like to plan ahead. It uses a curated review process, so labels and artists should send music several weeks before release with a promo note and clear genre tags. Because of that, it works better for structured promo campaigns than last-minute uploads.

    Genre Fit and DJ Audience

    Clear genre tags make a big difference here. They help DJs sort through releases fast and find the tracks that match their sets.

    Label or Artist Promo Access

    The main thing with DJcity is timing. Submit early, because DJcity reviews releases before they reach DJs.

    File Quality and Edit Types

    DJcity supports downloads in multiple formats, which gives DJs the version that fits their setup.

    Feedback, Charts, or Campaign Data

    After delivery, check what play data DJcity shows. That gives you a better read on whether the release is getting traction.

    For labels that want a broader DJ base without a formal review gate, the next pool uses a different setup.

    4. BPM Supreme

    BPM Supreme

    BPM Supreme is a vetted DJ pool that follows much the same model as DJcity.

    That said, the source material available here doesn’t give us enough to go much deeper on features without guessing. So instead of stretching thin info, it makes more sense to stop there.

    For a closer look at audience reach and how submission access works, the next section breaks down Digital DJ Pool and shows how its setup differs from the pools listed above.

    5. Digital DJ Pool

    Digital DJ Pool

    Digital DJ Pool works well for labels that want a simple way to put unreleased music in front of DJs. The main goal is clear: build DJ support before the release goes live. What matters most here is the submission process, how files get delivered, and how well the platform tracks feedback.

    Label or Artist Promo Access

    Labels can upload unreleased tracks a few weeks ahead of release. Along with the audio file, they add a promo note and genre tags. DJs need to sign up before they can access the promo.

    Feedback, Charts, or Campaign Data

    Good pools gather star ratings and written comments. That kind of feedback can give you a better sense of how a track may land in clubs.

    6. Heavy Hits

    Heavy Hits

    Heavy Hits sends unreleased tracks to a vetted, genre-specific DJ list before release. That makes it a better fit for campaigns that need early feedback from the right DJs, not just a big blast.

    Genre Fit and DJ Audience

    Heavy Hits focuses on DJs who already play the same genre as the release. That helps early promo reach people who are more likely to play it, react to it, and give useful input.

    Label or Artist Promo Access

    Labels and artists can upload unreleased WAV or MP3 files with a promo note, then send them to Heavy Hits’ vetted DJ list. After upload, Heavy Hits sends the release to its vetted DJ list.

    Feedback and Campaign Data

    Heavy Hits collects DJ feedback and tracks engagement, so labels can check early response before the release goes live.

    If you need a broader commercial DJ mix, the next pool takes a wider approach.

    7. Crate Connect

    Crate Connect

    Crate Connect is built around DJ-ready audio and clean metadata for unreleased tracks. That makes it a strong fit for labels that care most about clean delivery and files DJs can use right away. If your team needs fast promo distribution without extra friction, this platform makes a lot of sense.

    With Crate Connect, labels send unreleased tracks to vetted DJs before the official release date. Those DJs can stream the music, download it, and leave feedback. On the label side, the upload process is pretty straightforward: add the tracks, include a promo note, choose the genre classification, and attach supporting credits.

    One of the main selling points is the file setup. Crate Connect provides 320kbps MP3s tagged with BPM, key, artist, and title, which is exactly the kind of detail DJs look for when they’re sorting tracks for a set. It also includes intro and outro versions, which gives DJs files that are ready to play, not files they need to fix first.

    Crate Connect makes the most sense for labels that want clean, playable assets more than deep campaign reporting. For a side-by-side look at access, file support, and reporting, see the comparison table below.

    Quick Comparison Table

    The table below boils the four filters down into one fast view: audience, access, file support, and reporting. Use it to line up each pool with the release plan that fits best.

    Platform Genre Focus DJ Audience Access Model Strongest Benefit Notable Limitation
    Promoly 20+ genres 1,300+ opt-in DJs and tastemakers Direct promo delivery, smartlinks, downloads Targeted outreach, feedback collection, real-time tracking No dedicated mobile DJ app or built-in audio watermarking
    ZipDJ Genre-specific lanes Vetted DJs sorted by genre Browse-and-download Focused genre targeting Limited direct outreach and feedback tools
    DJcity Broad, curated Vetted DJs via review process Browse-and-download Curated reach with structured submission Requires early lead time; no direct outreach
    BPM Supreme Club, hip-hop, open-format Vetted club and radio DJs Browse-and-download Strong club and radio DJ base Limited campaign tracking and feedback collection
    Digital DJ Pool Open-format, varied Vetted DJs across formats Browse-and-download Simple upload and delivery process Basic reporting; no direct outreach
    Heavy Hits Genre-specific Vetted genre-matched DJs Browse-and-download Early feedback from relevant DJs Smaller pool size than broader platforms
    Crate Connect Varied Vetted DJs seeking DJ-ready files Browse-and-download Clean metadata and DJ-ready file delivery Limited campaign reporting

    Rows 2–7 are pull-based DJ pools built for browse-and-download discovery. Promoly is a push-based platform built for direct outreach, feedback loops, and tracking – a different workflow that complements pool distribution.

    Now that the differences are easier to spot, the next move is picking the right pool at the right moment. From there, narrow the choice by submission timing, prep the right assets, and match each track to the pool that gives it the best shot.

    How to Use DJ Pools Effectively for a Release

    Once you pick a pool, execution is what decides whether your release gets played. Choosing the pool is only step one. After that, you need to send the right package at the right time.

    Prepare DJ-Ready Promo Assets

    Send clean, explicit, and radio versions, plus an extended mix when it makes sense. Add pro artwork and complete metadata: BPM, key, genre, and UPC. Include a UPC since some platforms can auto-pull metadata from it.

    Before you upload, check the file specs. Look at bitrate, sample rate, and LUFS so the track lands the way you want. Then add a short promo note with key supporters and a bit of release context.

    Time Pool Submissions Around the Release Date

    Timing can make or break the pitch. If you send promos during release week, you’re often already late. A better move is to submit a few weeks ahead of the release so DJs have time to hear the track, test it, and send early feedback.

    Match Each Track to the Right Pool

    Not every pool fits every record. Match each release to the pool’s genre and audience lane. Check which DJs are active in the pool, then line up the release with the right use case. If the DJs already play that style, your odds go up.

    That keeps the promo tight and aimed at the people most likely to use the record.

    Combine Pool Coverage with Direct Outreach

    DJ pools can put your music in front of more people, but they don’t show opens, plays, or feedback. Promoly adds tracked sends, feedback, and automated reminders, which takes care of follow-up on its own. When you pair pool submissions with a targeted Promoly campaign, labels get broad discovery and a measurable feedback loop on the same release.

    That lead-in sets up the direct-promo tradeoff below.

    DJ Pools vs. Direct Promo Campaigns

    If you want both reach and measurement, it helps to put pool distribution next to direct promo. They do different jobs: reach vs. precision. One gets your release in front of more DJs. The other shows you who opened, played, and downloaded it.

    What DJ Pools Do Well

    DJ pools are built for scale. They put a release in front of a large vetted DJ base that’s already looking for genre-matched promos.

    That makes them a strong pick when the goal is discovery. If you want more DJs to hear the track and give it a shot, pools can help get that ball rolling.

    What Direct Promo Campaigns Do Better

    Direct promo is better when you want clean tracking and tighter follow-up. You can see opens, plays, downloads, and keep a record of who engaged from one release to the next.

    Promoly reports an average open rate of 73% for its promo mailouts, and automated reminders take care of follow-up across multiple releases. That means less manual chasing and a clearer picture of who’s paying attention.

    Over time, each campaign adds to your support history. So instead of sending every new release to the same broad list, you can send it to a sharper group based on past engagement.

    When to Use Both Together

    Use both when the release has enough lead time to support two lanes of outreach.

    Let the pool do the wide push. Then use direct promo to follow up with DJs who’ve already shown support. It’s a simple split, but it works well when you want discovery and trackable engagement.

    Pros and Cons Table

    This split comes down to reach, targeting, and follow-up.

    Feature DJ Pools Direct Promo Campaigns
    Reach High – access to a large network of vetted DJs Narrow – your own curated list
    Targeting Genre-based segments Individual-level, based on engagement history
    Feedback General ratings and comments per release Detailed, tracked response across releases
    Analytics Single-release stats Long-term engagement data that builds over time
    Follow-Up Control Manual per-release setup Automated reminders and follow-ups
    Best Fit Seeding a release to new audiences Securing support from proven tastemakers

    Conclusion

    After looking at the pools above, the choice comes down to fit, timing, and reporting. There isn’t one DJ pool that’s right for every release.

    Pick based on the genre, the DJs you want to reach, and whether your main goal is broad reach or tighter tracking.

    DJ pools work well for discovery. After that, direct outreach helps move things forward. When you track opens, plays, and downloads, you can see which pools are driving actual support over time.

    Choose the pool that fits the release, then watch what gets played and shared.

    FAQs

    How do I choose the right DJ pool for my genre?

    Start with your goals and your scale. If you’re an indie label or a solo artist, a platform like Promoly can make life a lot easier because it puts promo campaigns, smartlinks, pre-save campaigns, and feedback collection in one place.

    Focus on four things: genre fit, features, data ownership, and pricing. In plain English, that means checking whether the platform reaches DJs in your genre and region, gives you the tools you’ll use, lets you track support over time, and has clear pricing that lines up with how often you release music.

    When should I submit my track before release day?

    Send your unreleased track to DJs a few weeks before the planned release date. That gives them enough time to listen, send feedback, and back the release with chart support or club and radio plays.

    With Promoly, you can upload your track, add a promo note, and track opens, plays, downloads, and feedback before launch.

    What files and metadata should I send to DJs?

    Send your audio file with key release details, a strong description, and high-quality artwork. If you have a UPC, the platform may auto-fill some of that info for you.

    You can also add promo video links, press releases, and tech details like BPM and key. A polished promo package gives DJs the context they need to review, stream, and download your music.

    Related Blog Posts